How to Make A Hip Hop Beat?
Learn how to make a hip hop beat in Ableton Live. This beginner’s guide to beat-making takes you through the steps. FREE Live project download included!

Hip hop is one of the most popular music genres in the world. Here are ten hip hop production tips using Ableton Live.
We’ve also provided an example Live 10 project containing the MIDI clips created in this tutorial. Download the project FREE .
What do I Need to Make Beats?
Every beat-maker will have a personalized setup. To make beats with the basics, you’ll need:
- A computer or beat making workstation like MPC ONE or NI Maschine.
- A Digital Audio Workstation (DAW) or beat-making software. This tutorial uses Ableton Live.
- A high-quality sample library. The samples available to you will affect the quality of your drum groove and your decisions.
- Studio monitors or headphones to hear your killer beats.
- An audio interface if you have studio monitors and controllers.
- A MIDI controller with drum pads to tap out your beats. (Optional)
- Audio effects to process your beats and overall mix.
- Reference tracks to analyze drum patterns, learn techniques, and find inspiration.
How To Make A Hip Hop Beat?
This guide to making beats for beginners takes you through twelve fundamental steps of creating a modern hip hop beat.
Here is the complete hip hop beat created in this tutorial.
1. Develop a Workflow That Works Best for You
There are several ways to make beats in Ableton Live. You can build your beats in Arrangement View or Session View.
You can also sequence your drum hits using audio samples, MIDI, or a combination of both.
In addition, Live has several features to assist your creativity. For example, you can:
- Chop up existing drum loops using the Convert commands. This method generates MIDI you can use as a starting point for new music.
- Use Live’s Drum Rack presets as a starting point. This method is excellent for laying down a drum groove fast.
- Record beats using a MIDI controller like Ableton Push. You can tap out beats instead of manually drawing in MIDI notes or sequencing samples on a timeline.
- Use Live’s Arpeggiator device to generate rhythmical patterns from either incoming MIDI notes or chords. This method is great for creating unique hi-hat patterns.
- Ignite your initial creative spark with pre-made MIDI files and samples. Lots of material online will give you instant inspiration!
- Which approach you use depends on your workflow. This tutorial shows how to make hip hop beats using Live’s Drum Rack in Session View.
Tip : If you’re new to making beats, create a bar or two at a time. Then duplicate that loop and change the pattern. Repeat this process until you have an eight or sixteen bar drum loop. This technique works great for adding variation without feeling overwhelmed.
2. Set the Tempo
Several factors determine the style (or genre) of music, including the sounds, patterns, and tempo used.
For example, hip hop music typically has a tempo range of 60-100 BPM. You can also double the actual tempo to create a half-time feel.
Half-time and double-time beats are most common in hip hop, trap, and R&B. This approach makes it easier to program faster percussion rolls with hi-hats, snares, etc.
Doubling the tempo doesn’t change the time signature. It only changes the feel of the rhythm. There are still four beats per bar in double-time.
For example, a standard 4/4 beat places the snare on the second and fourth beats. Whereas double-time places the snare on the third beat.
Steps:
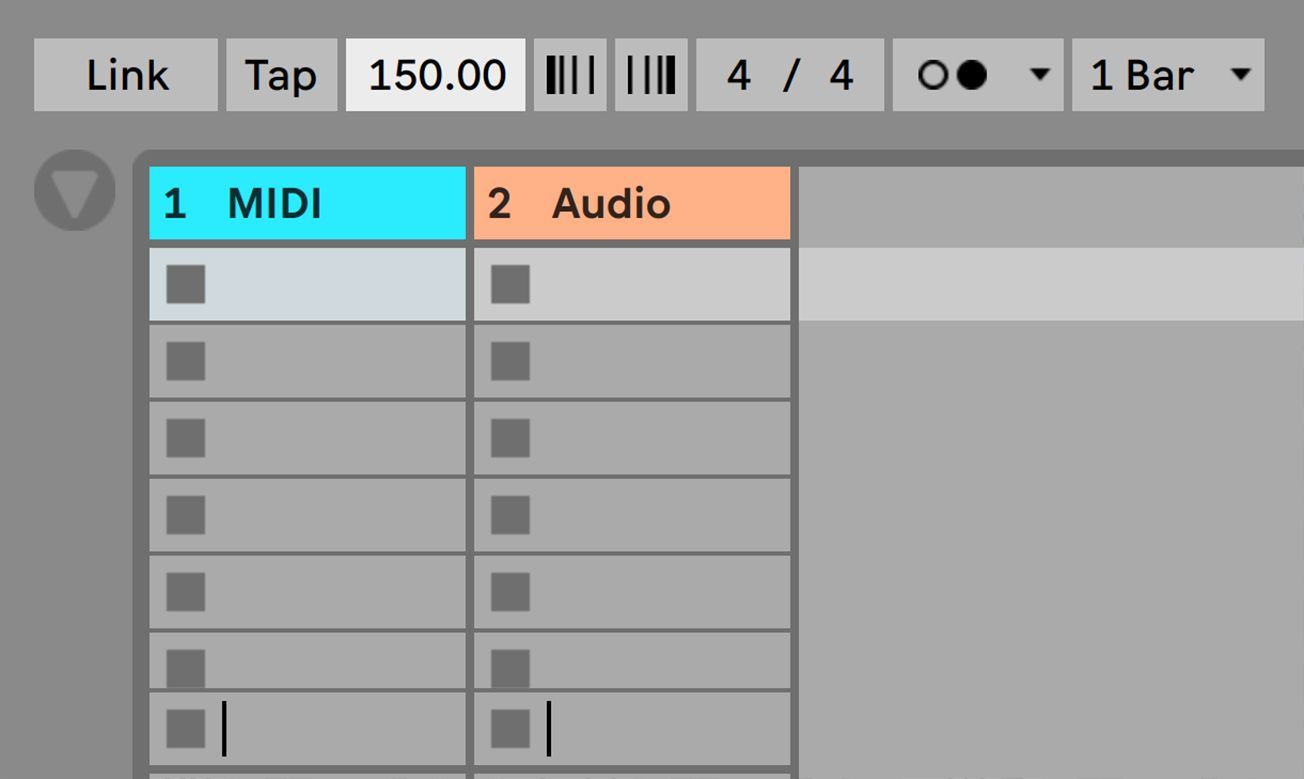
Set your tempo in Live from the Control Bar in the upper left side of the interface.
The drum rhythm in this tutorial has a half-time feel. It’s in 4/4 time with a tempo of 150 BPM. You could also make this same beat at 75 BPM.
Tip : Some find it easier to start with slower tempos while programming beats. Then, speed up the tempo once the drum groove is complete.
3. Load a Drum Rack Preset
One of the fastest ways to make beats is to sketch them out in Live with Drum Rack presets. Live comes loaded with several Drum Rack kits. Knowing how to locate, utilize, and manipulate these sounds is essential for streamlining your creative workflow.
It’s faster to use a preset and then replace drum and percussion samples after you build a foundation. Avoid slowing your creativity fussing with sample selection before you have a drum pattern.
Steps:
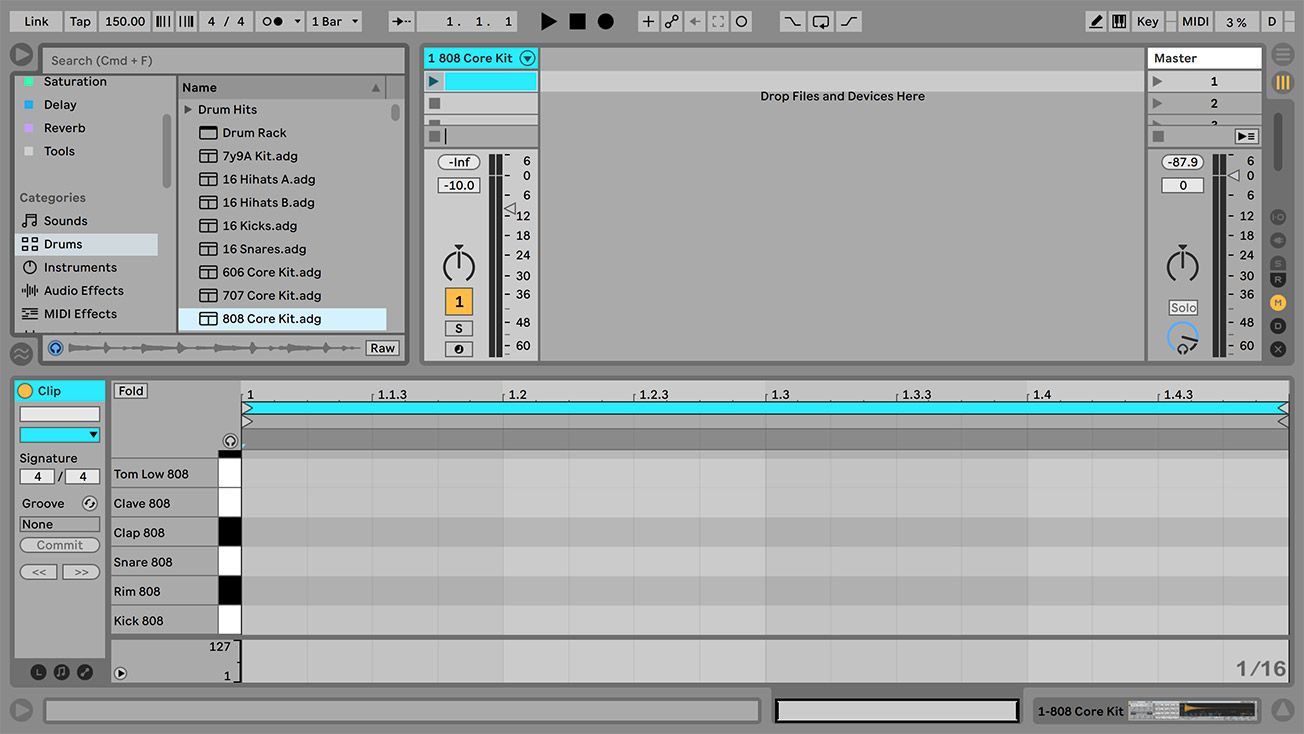
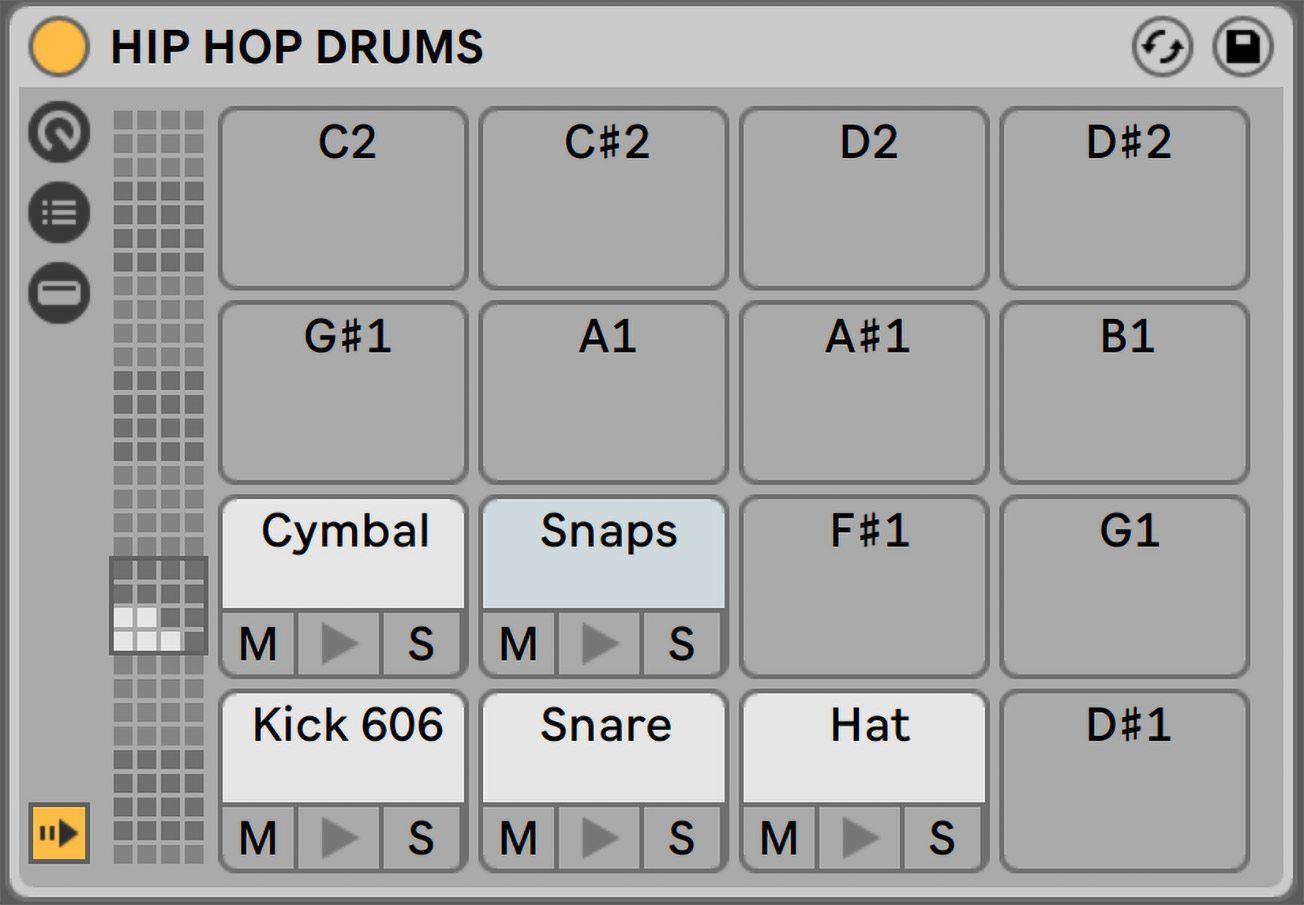
Create a drum kit by dragging a Drum Rack present from the browser into a MIDI track.
Next, double-click in an empty clip slot to create a MIDI clip. Then click the clip to reveal the MIDI Note Editor with all the drum samples. The MIDI Editor is where you’ll build your drum pattern.
4. Create a Kick Drum and Snare Pattern
The kick and snare groove will be the foundation of your beat. The kick drum emphasizes the downbeats and provides momentum. The snare drum acts as the backbeat and usually plays on unstressed positions.
For example, a simple 4/4 time hip hop groove places the kick on beats one and three. Then the snare responds to the kick on beats two and four.
In double-time, the main snare most always plays on the third beat. Then you can experiment with different kick patterns between each snare.
There are no set rules! Do what sounds good to you and works with the other elements in the mix.
Steps:
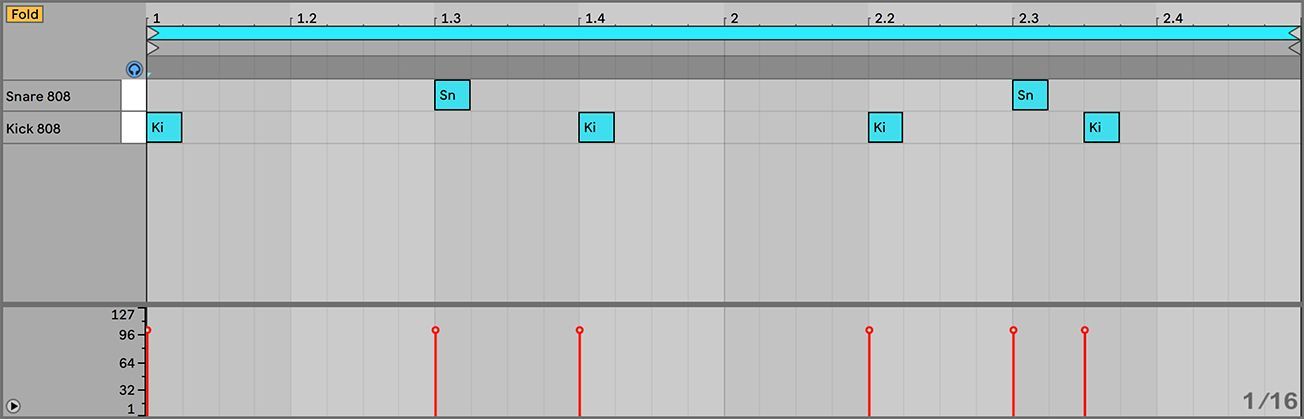
Start by creating a simple drum pattern you can build on. It’s easier to develop more complex beats once you have a basic pattern.
This example is a two-bar loop. The main snare plays on the third throughout the entire beat. Later in the process, you can add ghost snares between the main snares.
Kick patterns vary in hip hop. You have a lot of freedom when programming a kicks. Use your ears to determine what sounds good to you. This example uses a typical kick pattern.
Later in the process, we’ll duplicate the loop and edit the pattern to create variation. For example, move notes and add a ghost kick.
Remember to keep it simple. Get the backbone of your beat down. Then go back to add ghost kicks and snares, variation, and other elements.
Also, leave enough space for the vocal track, bassline, and melody.
5. Add a Hi-Hat Pattern
Hip hop also relies heavily on hi-hats to create groove and energy.
Hip hop beats use a combination of closed and open hi-hat patterns. Closed hats typically switch between 16th, 32nd, and 8th note patterns. Whereas open hats usually play on the offbeats.
Triplet fills are also effective in modern hip hop. Triplets are great for transitions and adding energy to keep the beat exciting.
Steps:
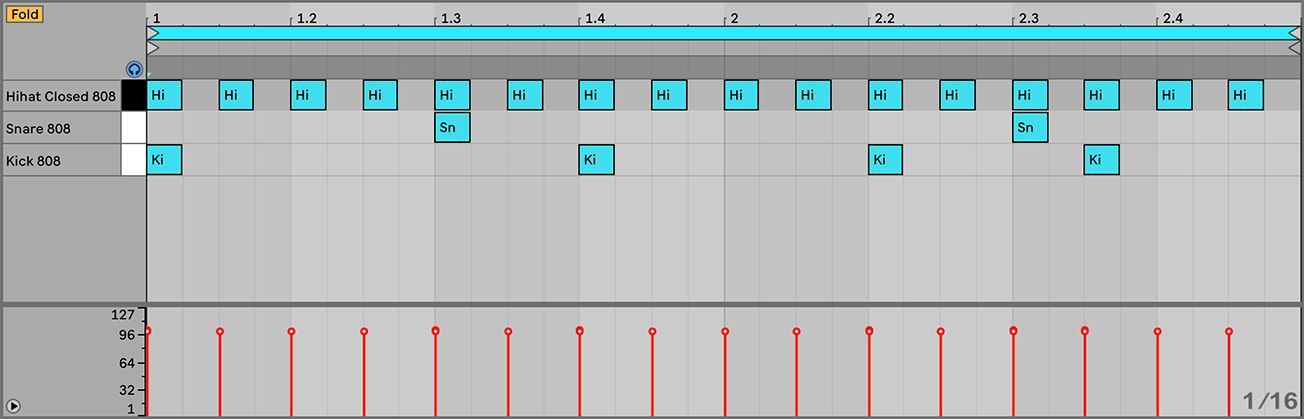
Start with a closed hat on every eighth or sixteenth note. This example places a hi-hat on every eighth note.
Once your beat develops, delete notes, rearrange notes, add fills, and apply velocity to create more interesting patterns.
6. Duplicate the Loop and Add Variation
Repeating this two-bar loop throughout the track will sound repetitive and boring. Make your beats interesting by adding variation.
The best way to add variation is to duplicate the loop and change the pattern. Repeat this process until you have an eight or sixteen bar drum loop.
Steps:
First, duplicate the loop. Second, edit the kick, snare, and hat patterns. Repeat this process until you have an eight or sixteen bar drum loop.
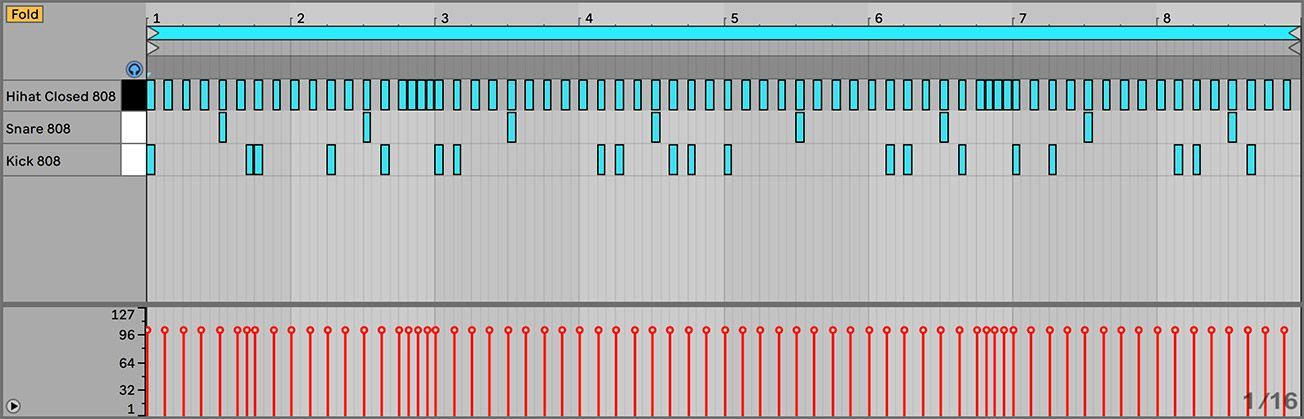
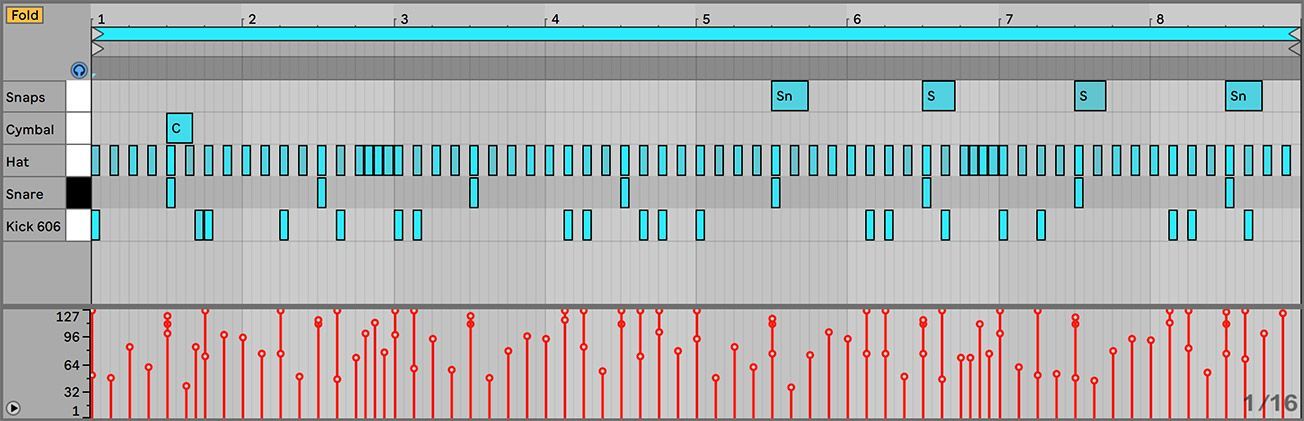
For this example, look at how the kick pattern changes over eight bars. There is also an added ghost kick in the first bar. Lastly, 32nd note hi-hat fills break up the repetitiveness and gives the beat more energy.
Edit your patterns by rearranging, deleting, and adding notes to create variation. But don’t go overboard. Make sure your beat flows with no awkward shifts in the rhythm.
7. Humanize Your Drums
Humanizing your beats is essential in hip hop. Injecting human character into your music is a great way to boost expression and realism.
A real drummer won’t have perfect timing and will never hit every kick, snare, or cymbal with the same velocity. The subtle variations and imperfections give the groove a natural vibe. Conversely, programmed MIDI drum sequences sound robotic, repetitive, and lifeless.
Music is all about movement, and humanizing your drums is a great way to keep your listeners moving.
These techniques offer creative ways to humanize your static drum patterns:
Adjust the Velocity on Various Hits
Live’s velocity markers set the volume or amplitude of each MIDI note. Use them to control how hard or soft a MIDI note sounds when played.
Giving your drum hits different velocity values will make them sound less rigid. The subtle differences in volume will also give your rhythms movement and syncopation. These moves sound more pleasing to listeners.
For example, apply different amounts of velocity to your hi-hat pattern. Use higher velocity values to emphasize downbeats and lower values for offbeats. Also, on fills, try ramping up the velocity from quiet to loud. This move is great for transitions.
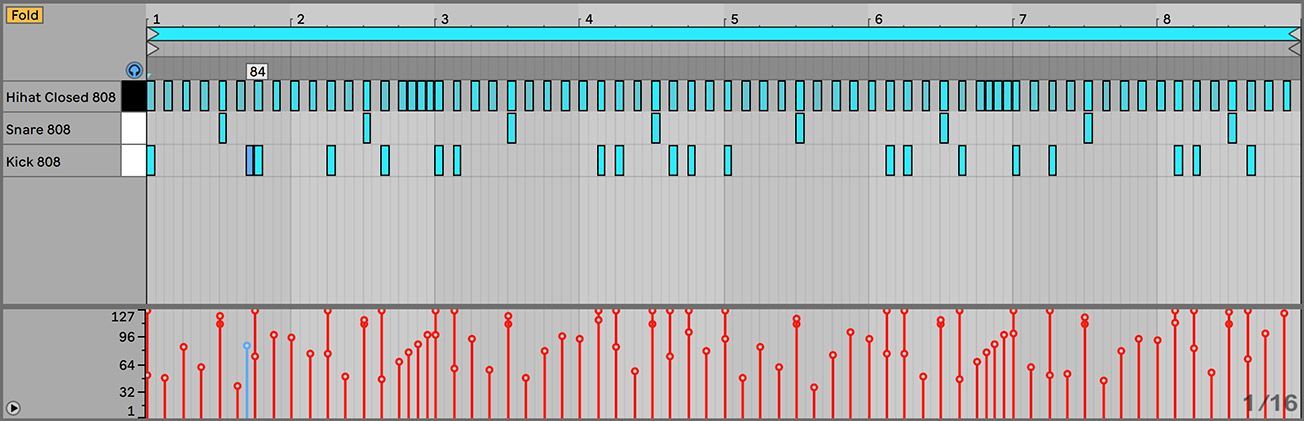
Changing the velocity of a MIDI note in Live is easy. Click and drag a note’s velocity marker in the Velocity Editor.
The velocity changes on the hi-hat pattern make a huge difference. There are also slightly lower velocity values on the snares. Lastly, the kick pattern stays consistent at 100% velocity except for the ghost kick.
Listen how the drum loop has more groove and vibe. This method is the easiest way to humanize drums!
Trigger Variations of a Sample
Inject life into your MIDI drum patterns by triggering different versions of the same sample. This technique adds variation to the timbre of each drum hit.

Set up Drum Rack to trigger different samples with these steps:
- Drop the same sample onto two or more Drum Rack pads.
- Slightly change each sample. For example, change the pitch, ADSR envelopes, filter, etc.
- Process them differently.
- Draw or recorded a pattern using the different sample versions.
Try this technique to humanize snares, claps, and hats.
Apply Swing From Live’s Groove Library
Applying groove changes the timing and feel of drum patterns. Notes 100% quantized to the grid can sound robotic, rigid, and repetitive.
Hip hop beats have swing and groove. However, some newer styles keep hits 100% quantized. It’s your choice!
You can manually move drum hits off the grid slightly or modify their timing with Live’s groove files. Live’s browser has a large selection of grooves you can drop onto audio and MIDI clips.
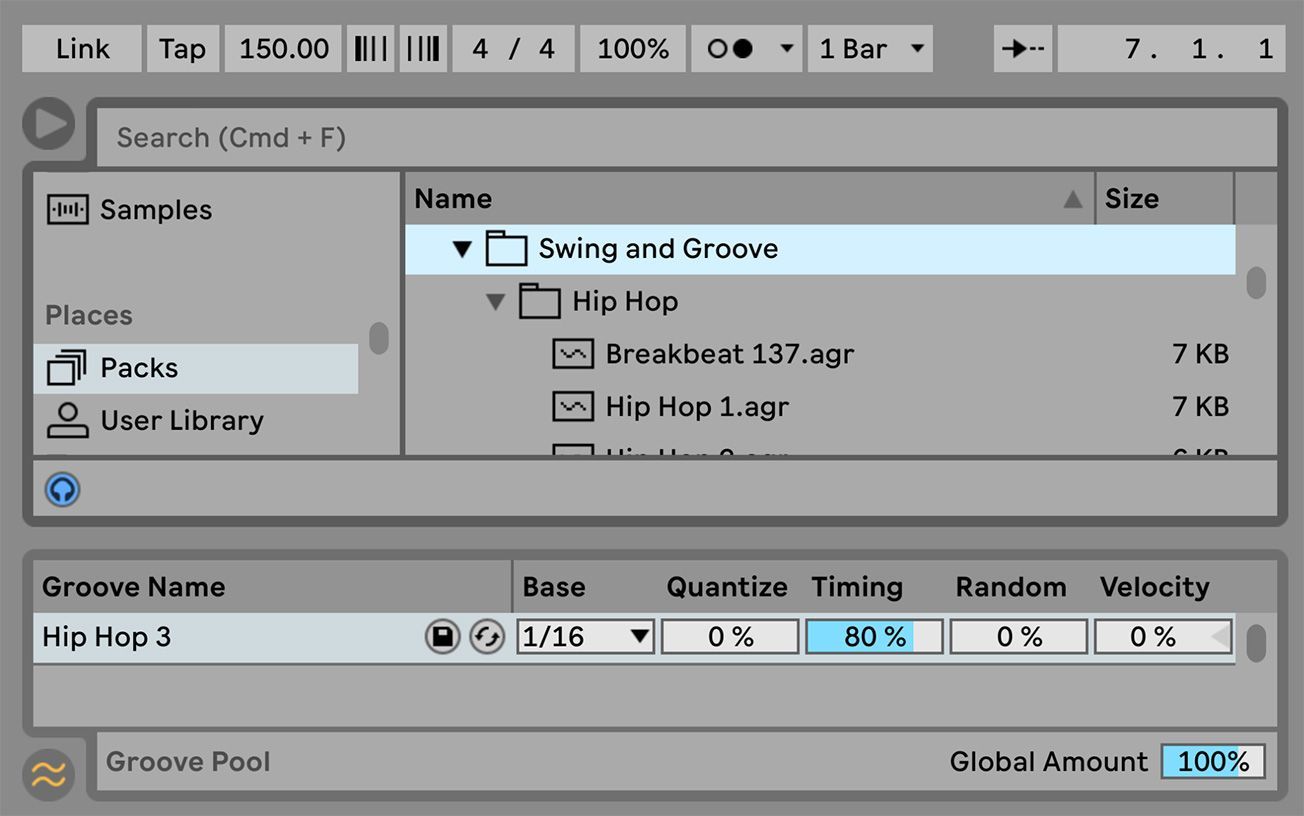
Once you’ve applied a groove file, modify its behavior by adjusting its controls in the Groove Pool. You can tweak timing, quantization, random timing fluctuation, and velocity.
This technique sounds best on percussion, such as hats, rides, shakers, etc. Ensure you don’t overdo your quantization though. Keep the timing tight.
Change the Pitch on Various Hits
Humanize your drums by changing the pitch of some hits by a small amount.
This technique is common in modern hip hop hi-hat patterns. For example, music producers will pitch down or up hi-hat fills. Pitching 808 basses is also effective.

If you’re using samples, change pitch by:
- Adjusting the Transpose or Detune controls from the Sample Box in Clip View.
- Automating the Transpose parameter from the Envelopes Box in Clip View.
- Using a pitch shifter plugin.
If you’re working with MIDI, change pitch by:
- Drawing in notes at different pitches with the MIDI Note Editor.
- Using the transpose, pitch, or glide controls on Live’s Simpler and Sampler Instruments.
- Using a pitch shifter plugin.
Change the Sample Length on Various Hits
Mixing different sample lengths also adds groove and variation. For example, make louder notes longer and quieter notes shorter. This technique creates a push and pull feeling that sounds more intriguing than a repetitive pattern.
It’s easy to change a sample’s length with Live’s Simpler and Sampler Instruments. Simply adjust the Decay, Sustain, and Release controls.
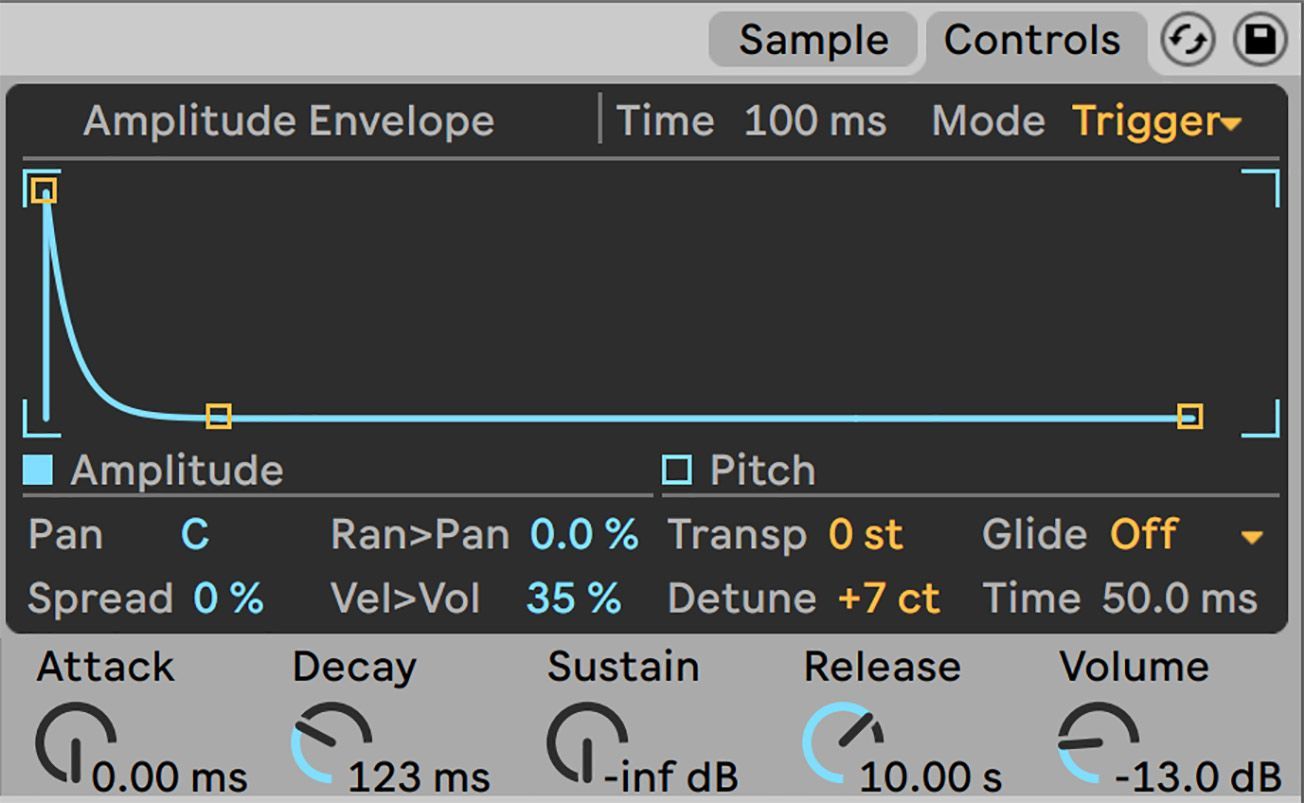
If you’re working with a Drum Rack, it’s easier to duplicate a sample before making edits. Duplicate a sample by holding Option (Mac) or CTRL (PC) and dragging it onto an empty pad.
Now you can make edits and program both hits without affecting the original sample.
8. Replace the Default Drum Samples With Your Own
Make your hip hop beats unique by using high-quality samples in your library. Using the right samples will give your rhythms character and a professional sound.
The foundation of hip hop beats typically have heavy kicks, punchy snares, sizzling hi-hats, and deep 808s. Music producers will then add percussion loops, claps, bass hits, and other sounds to make the beat more interesting.
Have you heard of “crate-digging?” The term describes music producers who find inspiration at the record store. They dig through crates of vinyl records to find their next golden sample.
Try sampling existing records or music on YouTube. Chop up your source material, process the samples, and use them in your beat. The old-school vibe or lo-fi sound characteristic of old vinyl is still popular.
Make your beats even more unique by adding field recordings or Foley. Go out and record everyday sounds and process them in creative ways. For example, sounds of nature, noisy crowds, traffic, machines, etc. can add interest and realism.
9. Add Percussion to Make the Beat More Interesting
After creating the backbone of your rhythm, add percussion and other sounds. Fill the offbeat gaps between the main elements to make your beat more interesting.
For example, use open hi-hats, crash cymbals, shakers, rides, or other percussion sounds. Remember to keep it simple. Hip hop beats are stripped back to make room for the vocals.
This example adds a crash cymbal, four finger snaps, and a sample loop with claps. Check out the complete beat.
10. Tune Your Drum Samples
Tuning drum samples to the key of your song is an essential technique often overlooked. Like any instrument, many drum sounds have defined pitches that correspond to notes on the musical scale.
Additionally, drum samples playing out of key with the rest of the song can sound dissonant or jarring to the listener. Conversely, tuned drums sound pleasing because they harmonize and groove better with other song elements.
Moreover, tuned drums improve harmonious relationships with basslines, chords, and other melodic parts. As a result, your mix will sound more cohesive.
However, not all drum sounds need tunning. Use your ears and judgment to determine what sounds best to you. Check out the guide below to learn how to tune your drum in Ableton Live.
[yuzo id=”13031″]
11. Complete Your Hip Hop Beat With a Bassline and Melody
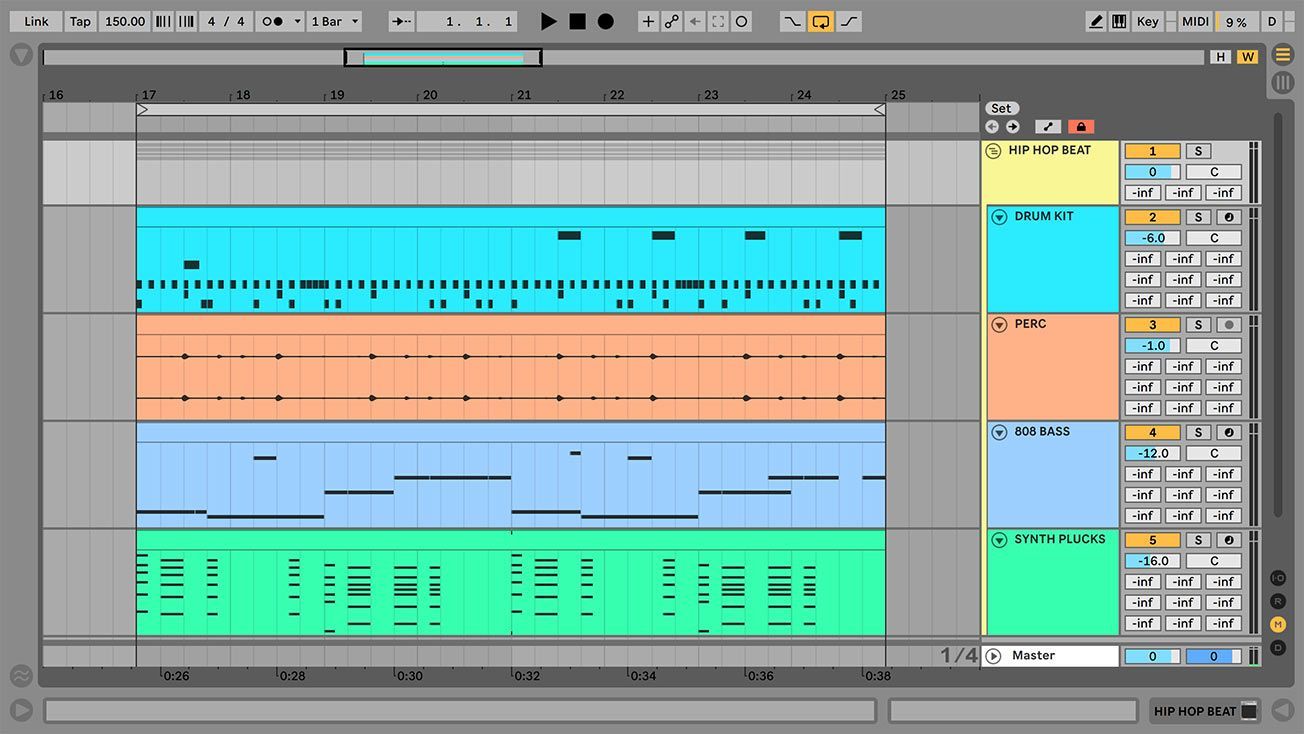
Every good hip hop jam has a melody and bassline that adds momentum to the groove. Often, the bass and melody distinguish the hip hop genre and region that influences the style.
For example, there’s a difference between West Coast, East Coast, and Dirty South hip hop tracks. Each style has signature characteristics heard in the melody, bass, rhythm, tempo, lyrics, samples, and instruments. The same idea applies to old-school and new-school hip hop.
Listen to your favorite hip hop and rap tracks. Analyze what makes them different. Pay close attention to the beat patterns, the placement of drum sounds, tempo, and the samples used. This technique is excellent for learning how to make hip hop beats.
You may notice hip hop melodies are short and straightforward. Many modern hip hop tracks have one or two bar looping melody that serves as a hook. Simple melodies are less distracting and allow you to focus more on the vocal.
The bass track adds a sense of weight to the beat. The most common bass is an 808. Roland’s TR-808 Rhythm Composer first popularized this iconic sound.
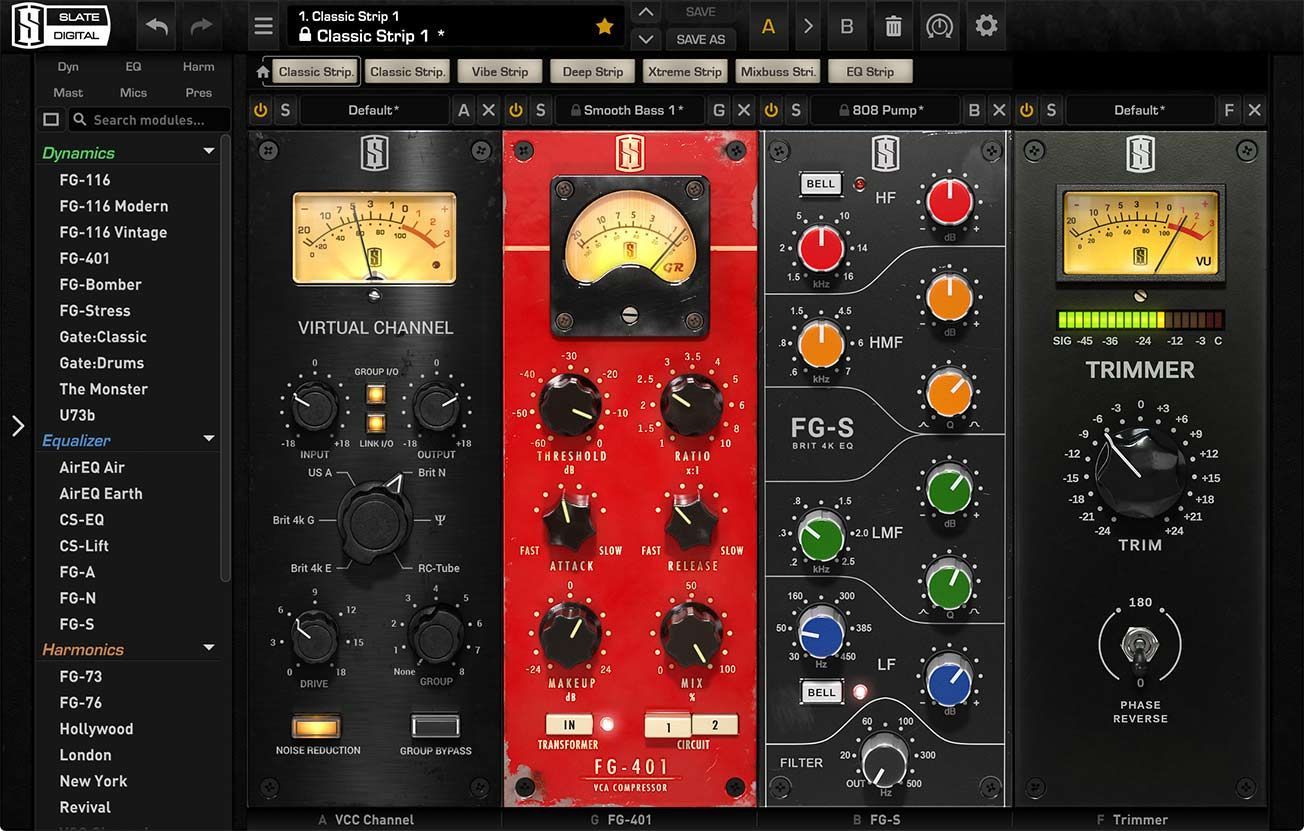
12. Apply Effects to Polish Your Hip Hop Beat
Learning how to mix a hip hop beat is also a critical step. A great mix will make your beats sound professional.
There are too many mixing strategies to list. However, standard techniques include:
- Selecting quality samples and loops.
- Gain staging to balance levels and create headroom.
- Tuning drum samples to play in key with other elements in the mix.
- Controlling dynamics to avoid clipping and improve dynamic range.
- Panning elements to create width and make space for different sounds.
- EQing sounds to reduce frequency masking and make space for the main elements.
- Balancing the frequency spectrum to help the mix translate on all sound systems.
- Removing harsh or problematic frequencies.
- Emphasizing musical frequencies.
- Applying reverb and delay to add dimension.
- Bus grouping to process multiple tracks.
- Setting up Return tracks for audio effects routing.
- Creating variation with various editing techniques.
- Increasing perceived loudness to meet commercial levels.
Primary audio effects needed in hip hop production include an:
- Equalizer
- Compressor
- Reverb
- Delay
- Limiter
- Saturator
- Distortion
- Gain utility
- Auto pan
- Vinyl simulator
- Spectrum analyzer
Everyone will have their own set of tools and techniques. Do what works best for your workflow.
Conclusion
Now that you know how to make a hip hop beat, here are some final tips to close with:
- Start with a simple drum pattern and build upon it.
- Keep your beats stripped down to make space for the vocal.
- Avoid complex changes in the rhythm, bassline, and melody.
- Keep things simple to avoid interfering with the rapper’s flow and lyrics.
- Create variations of your beat to use in different sections of the track.
- Don’t have the same drum loop repeating throughout the track. Repetition will get boring to the listener.
- Create variation every four to eight bars to make your drum loop more engaging. For example, add or remove drum hits, create fills, adjust velocity, change samples in different sections, add accents, etc.
- Avoid using heavy amounts of reverb and delay. Hip hop beats are typically dry and upfront.
- Try to recreate drum loops from your favorite tracks as a way to develop your beat-making skills.
What’s great is you can apply most of these music production techniques for any genre!

MORE ARTICLES FROM THE ICON BLOG


