How to Humanize Your Drums in Ableton Live
Learn how to make programmed drums sound more realistic. This guide offers five techniques to humanize drums in Ableton Live and make them more expressive.

Humanizing Drums
One challenge of programming drums in Ableton Live is maintaining a human feel. When a real drummer plays, subtle variations and imperfections give the groove a natural vibe. Conversely, programmed MIDI drum sequences can easily sound robotic and repetitive, leaving listeners bored.
Music is all about movement and humanizing your drums is a great way to keep your listeners moving. Injecting human character into your music is a great way to boost expression and realism. One of the best ways to achieve natural groove and vibe in your music is to humanize drums.
The following techniques offer some creative ways to add some life into your static drum patterns in Ableton Live.
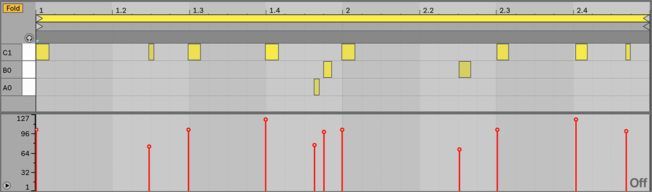
1. Velocity Variation
Velocity controls how hard or soft a MIDI note sounds when played back. Moreover, velocity values determine the volume or amplitude of a sound. For example, the harder you hit the pads or keys on a controller, the louder the sound will be.
Giving your MIDI drum hits different velocity values will make them sound less rigid. Also, the subtle differences in volume will give your rhythms extra movement that sounds pleasing to listeners. This is the easiest way to humanize drums.
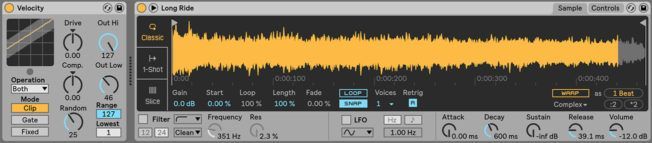
Changing the velocity of a MIDI note in Live is easy. Click and drag a notes velocity marker in the Velocity Editor. However, adjusting velocities for every note is time-consuming. An alternative is to use Live’s Velocity MIDI device.

The Velocity device can randomly change incoming MIDI note velocity values. It’s a quick way to introduce random modulation to all note velocities. Moreover, this method simulates the natural volume fluctuations of a real drummer. Try it on your hats, rides, and shakers!
Apply this technique by inserting Velocity before your instrument and increasing the Random control. You can also adjust the Out Hi and Out Low amounts if the velocity ranges sound too loud or quite.
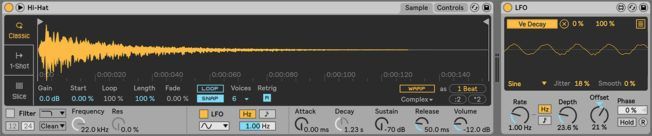
2. LFO Modulation
Modulating various parameters with an LFO is another technique that humanizes drums. Try the following three methods to make subtle changes to drum hits with an LFO:
LFO Modulation with Simpler
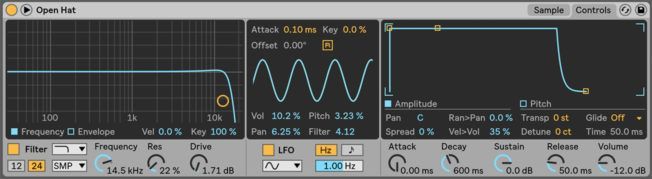
Live’s Simpler instrument has an LFO section that offers controls to modulate volume, pitch, pan, and filter cutoff frequency. Applying subtle amounts of movement to these controls simulates the natural fluctuations of a real drummer. Also, deactivate the LFO Retrigger button in this section to hear the effect.
LFO Modulation with Sampler
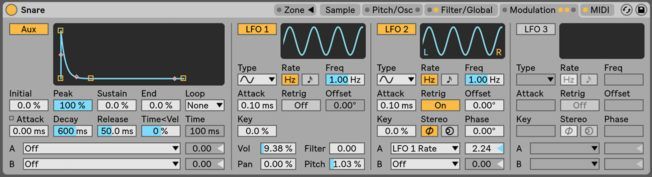
Live’s Sampler instrument has a Modulation tab that offers an additional loopable envelope and three LFO’s. Sampler gives you more advanced control than Simpler. For example, the LFO’s can modulate themselves. Use the three LFO’s to add subtle amounts of movement to various controls to create a realistic sounding groove.
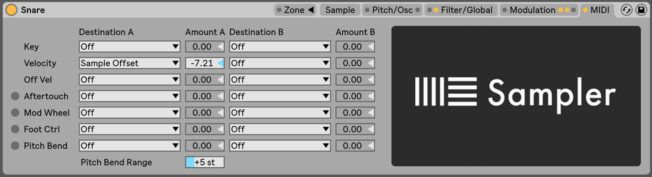
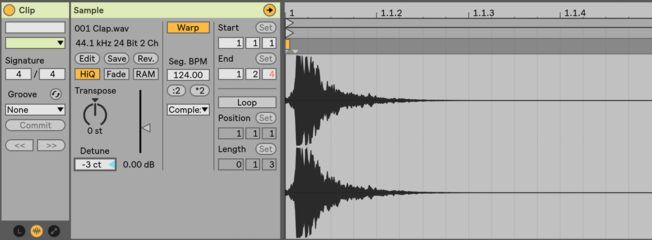
Sampler also has a Sample Offset feature that changes the sample start point with velocity. For example, notes triggered at full velocity will play the sample from the original start position. Whereas, lower velocities will start playback further into the sample. This feature is available from the MIDI tab. Select Sample Offset from the Velocity chooser and adjust the Amount A slider. Try this technique on a kick or snare ghost hit!
Max for Live LFO
Those with Max for Live will enjoy the new LFO device available in Live 10. The upgrade allows you to map and modulate multiple parameters. With LFO, you can modulate nearly everything in Live. It also offers various controls to alter the behavior of the waveform. For example, the Jitter control introduces small inconsistent movements to the LFO waveform.
Below are examples of some controls to modulate with the LFO device:
- Decay to add note length variation.
- Volume to simulate velocity chances.
- Pan to add stereo movement.
- Filter frequency and resonance to alter the timbre.
- Pitch to simulate changes in timbre.
- Various filter envelope controls to add subtle timbral fluctuations.
- Sample start to shift the playback position of a sample.
- Global Groove to add timing variation.
- Dry/Wet to introduce small amounts of saturation, delay, reverb, chorus, etc.
- Frequency Shifter’s Fine control to apply subtle pitch changes.
- Various LFO controls on other instances of the device.
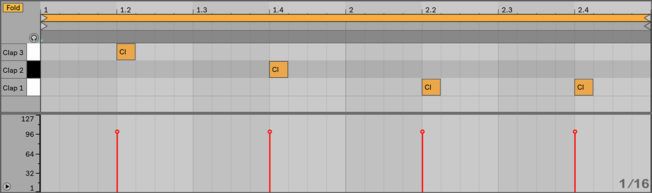
3. Varying Sample Selection
Inject life into your MIDI drum patterns by triggering different versions of the same sample over time. This technique adds variation to the timbre of each drum hit. It also works excellent at humanizing snares, claps, and hats. Below are two methods used for triggering the different samples with Drum Rack:
- Drop the same sample onto two or more Drum Rack pads.
- Make subtle changes to each sample. For example, adjust the pitch, ADSR envelopes, filter, etc. Processing them with different EQ curves also works excellent.
- Draw or recorded a pattern that triggers the different sample versions.

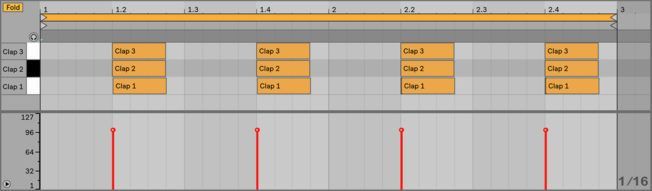
You can also automate the technique above using Live’s Arpeggiator. This method triggers the different sample versions randomly. It’s a quick way to humanize drums with variation.
- Drop the same sample or a selection of similar sounding samples onto two or more Drum Rack pads.
- If you’re using the same sample, make subtle changes to each copy.
- Draw in MIDI notes for each sample when creating your pattern.
- Insert Aprgegatator and choose Random from Style chooser.
- Adjust the Rate control as needed. The rate will vary based on the tempo and pattern.

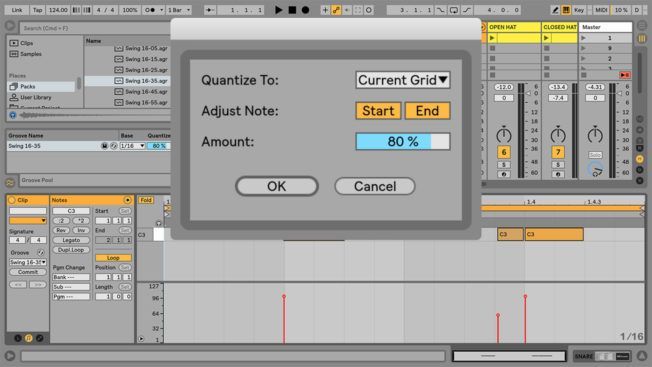
4. Applying Groove
Applying groove is an essential technique that changes the timing of your drum patterns. You can manually move the position of various drum hits or modify their timing with grooves. Live’s browser has a large selection of grooves you can drag and drop onto audio and MIDI clips.
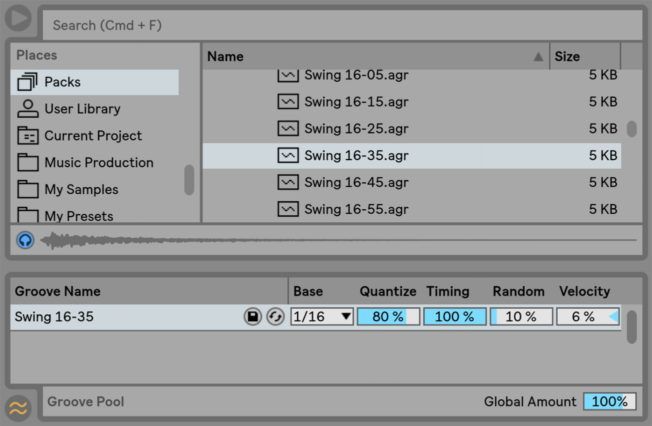
Once you’ve applied a groove file, modify its behavior by adjusting its controls in the Groove Pool. You can tweak timing, quantization, random timing fluctuation, and velocity. This technique works great on all drum elements. However, it sounds best on percussion, such as hats, rides, shakers, etc.
Disabling Live’s Record Quantization when recording beats is another way to get a humanized feel. However, if you struggle at keeping on beat, use partial quantization settings. For example, try quantizing to 80% rather than 100%.
5. Pitch and Duration
Mixing different drum hit lengths adds groove and variation that sounds human-like. For example, make louder notes longer and quieter notes shorter. You can shorten or lengthen various drum hit samples or MIDI notes. This technique also creates a push and pull feeling that sounds more intriguing than a repetitive pattern.
A final tip to create humanized drums is to modify the pitch of each hit by a small amount. If you’re using samples, adjust the pitch of various hits a few cents from the Sample Box in Clip View. Or, if you’re working with MIDI, draw in notes at different pitches with the MIDI Note Editor.
Conclusion
Humanizing your programmed beats is a great way to inject organic vibe into your music. This guide offers a few techniques to get your grooves sounding more natural and less robotic. The goal is to apply subtle variations in timing, timbre, duration, dynamics, and any other creative way to impart the imperfections of a real drummer.

MORE ARTICLES FROM THE ICON BLOG


