How to Isolate or Remove Vocals from a Song
Looking to remix a song with a stellar vocal or create a mashup and need the acapella? This guide shows you how to isolate or remove vocals from a song. Learn how to isolate vocals with phase cancellation in both Ableton Live and Logic Pro X. You’ll also learn how to separate vocals from a song with Music Rebalance in iZotope RX 7.

What is Phase Cancellation?
Phase cancellation is an audio phenomenon that occurs when similar waveforms work against each other. Two combined signals with the same frequencies cancel each other out when their waveforms are out of phase. For example, a waveform has many peaks and troughs. If the peaks and troughs of identical waveforms are out of sync, they cancel each other out. In other words, playing two exact waveforms that are 180 degrees or 100% out of phase results in silence. Conversely, playing two identical signals in phase will cause an increase in amplitude.
How to Isolate or Remove Vocals with Phase Cancellation
Isolating vocals from other songs with phase cancellation is an effective way to score sought-after acapellas. There are various other ways to isolate vocals in a song. Though, phase cancellation is one of the most efficient methods to extract vocals from a mix. The technique requires an original vocal mix and an identical instrumental version of the same song. The magic happens when you flip the phase on a vocal mix while simultaneously playing back the instrumental mix. Inverting the phase of one track while playing them together will cancel out all the instrumentation, leaving only the vocals. This technique also works in reverse. You can remove vocals to create an instrumental version of a song.
Potential Mix Issues
The phase cancellation method often works better than the other techniques used to remove vocals. However, it doesn’t always work 100%. Different factors can affect the results. First, it’s essential to use high-quality audio files and to ensure the vocal version is identical to the instrumental version. Second, other sounds may bleed through. For example, background noises picked up while recording the vocals. Third, the mastered versions may vary if any virtual instrument or audio effect has a random feature enabled. Forth, this technique doesn’t work well when vocals are panned, modulated in any way, or are swimming in lots of reverb. This technique works best when the vocal track is dry and mono.
If you find unnecessary sounds, use an EQ to cut them and remove any problematic frequencies. You could also use specialized audio repair tools such as iZotope’s RX to isolate vocals from a song.
Demo Song Examples
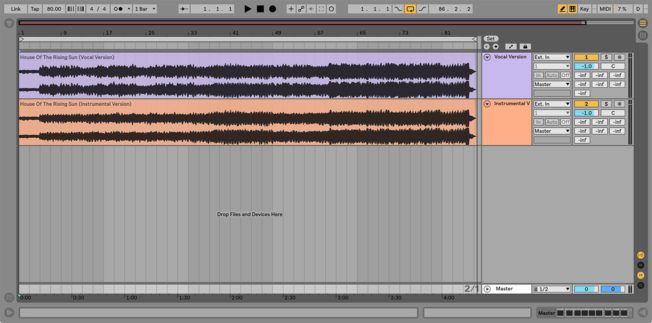
These recordings are a cover of ‘ House of the Rising Sun ‘ made famous by The Animals.
How to Isolate Vocals in Ableton Live
Removing vocals in Ableton Live using the phase cancellation method is easy. All you need is two quality recordings and Live’s Utility device.
Step 1 | Importing Songs
Load the vocal mix and instrumental mix to separate audio tracks in Arrangement View. Also, make sure to line up both tracks along the grid.
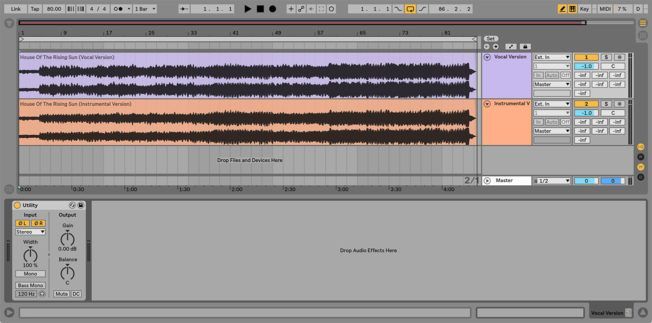
Step 2 | Phase Inversion with Utility
Load Live’s Utility device on the vocal mix and enable both the Left and Right Phase buttons. If everything goes right, you should only hear the vocals when playing back both tracks together.
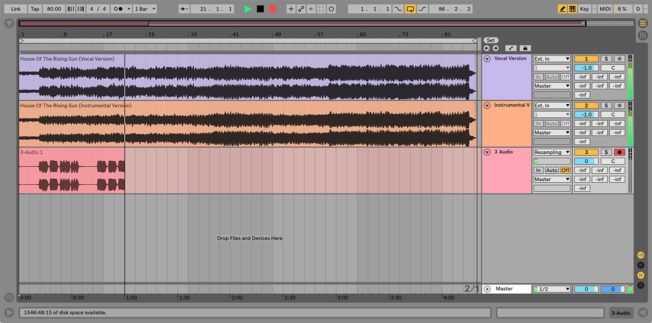
Step 3 | Recording the Vocals
Create a new audio track to record the results. Next, select ‘Resampling’ from the Input Channel chooser and arm the track for recording. Lastly, enable the Arrangement Recording button to begin recording.
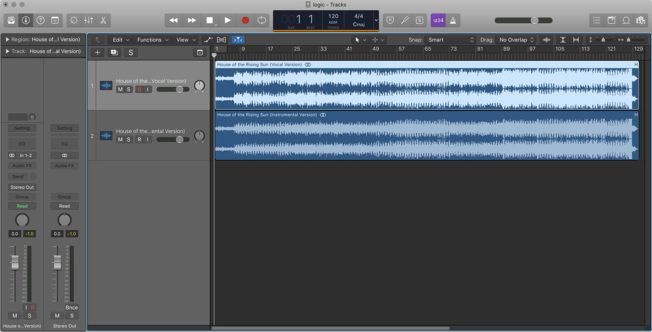
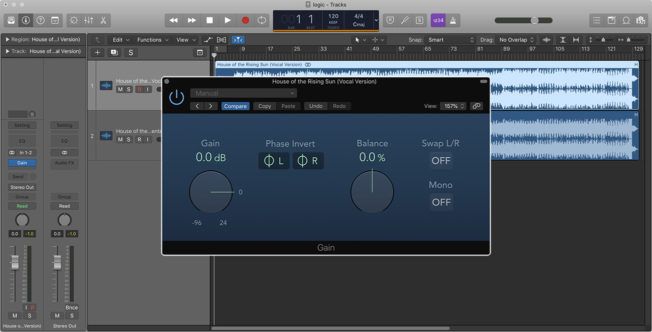
How to Isolate Vocals in Logic Pro X
The steps for removing vocals in Logic Pro X using phase cancellation is like the steps outlined for Ableton Live.
Step 1 | Importing Songs
Import the vocal mix and instrumental mix to separate audio tracks. Again, line up both tracks along the grid.
Step 2 | Phase Inversion with Gain
Load Logic’s Gain device on the vocal mix and enable both the Left and Right Phase Invert buttons.
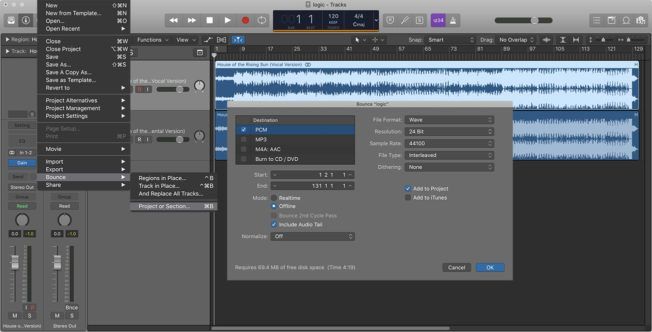
Step 3 | Bouncing the Vocals
There are a few different ways to resample in Logic Pro X. One quick way to record the results is with Logic’s Bounce feature. Select File > Bounce > Project or Section. Choose your bounce settings, click OK, and set the bounce filename and location. Logic will create a new file of the resampled audio that you can drag into your project.
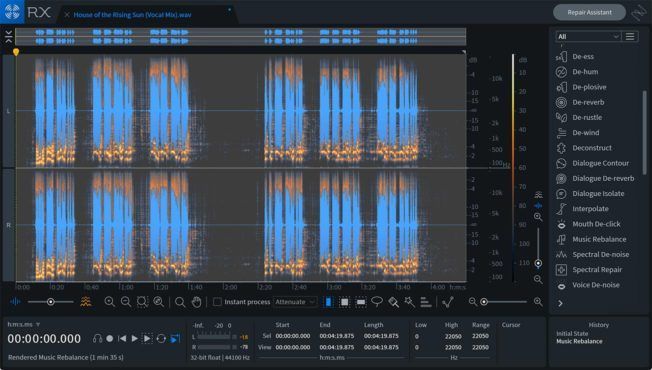
How to Separate Vocals with iZotope RX 7
iZotope’s RX software has been at the forefront of innovation in audio repair. With RX 7, iZotope included even more advanced features. One notable addition is Music Rebalance. This impressive source separation tool allows you to adjust levels and isolate elements in an audio track. For example, you can isolate or remove vocals, bass, percussion, and other instruments from a mono or stereo file.
Moreover, this innovative tool makes it easy to extract vocals from any song and use them for a remix. This ability also works in reverse. You can use RX 7 to remove vocals or other parts to create an instrumental version of a song. This approach also eliminates the need for different track versions or stems.
Isolating vocals with Music Rebalance in RX 7 is quick and easy. The software runs as a standalone audio editor. However, you can connect to your DAW via the RX Connect plugin. There’s also a suite of plugin modules available in your DAW.
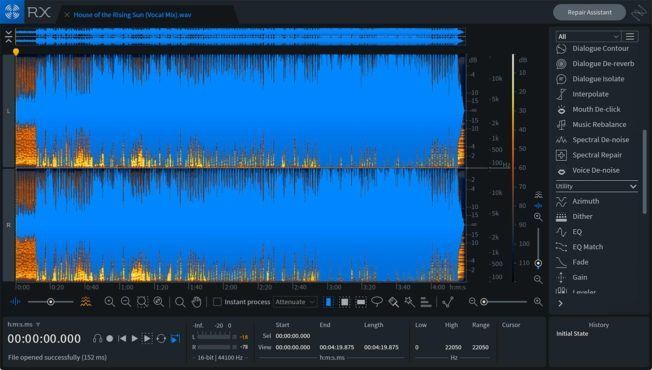
Step 1 | Importing a Song
To get started, launch RX 7 and import a song. You can use the File menu, Open File button, or drag and drop a song into the editor window.
Step 2 | Launch Music Rebalance
Choose Music Rebalance from the right-side Module List. After Music Rebalance opens, turn down the Bass, Percussion, and Other sliders. Leave the Voice slider at zero to focus on isolating vocals.
Step 3 | Choose a Separation Algorithm
Select a Separation algorithm from the drop-down chooser. These algorithms determine performance and processing speeds. For example, Advanced Joint Channel mode offers the highest quality separation results.
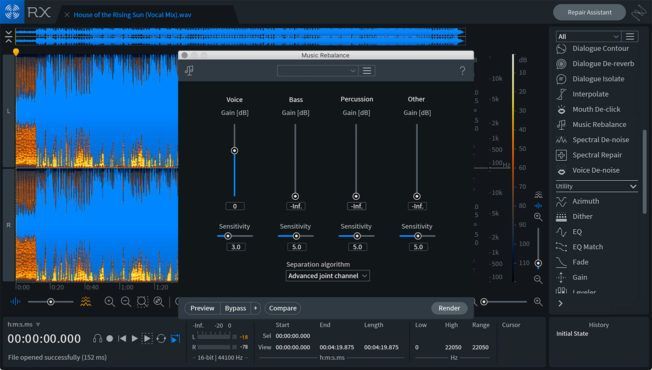
Step 4 | Adjust Sensitivity
Adjust the Sensitivity meter to get the best results. Lower values contain less audible “bleed” from other mix elements. However, this can introduce artifacts and reduce vocal clarity. Whereas higher values will have fewer audible artifacts and more potential for bleed.
Step 5 | Render
When ready, press Render to create a file containing the isolated vocals. Lastly, export the file and drop it into your DAW for further editing.
Is Removing Vocals from a Song Legal?
It is not legal to use vocals from copyrighted music commercially. You must get permission before using the vocals for commercial gain. This includes using music with copyrighted vocals for YouTube, a podcast, or any other public media source.

MORE ARTICLES FROM THE ICON BLOG


