Learn how to record vocals in Ableton Live. This guide takes you through the steps for recording vocals and offers tips for capturing perfect vocal takes.
How to Record Vocals in Ableton Live
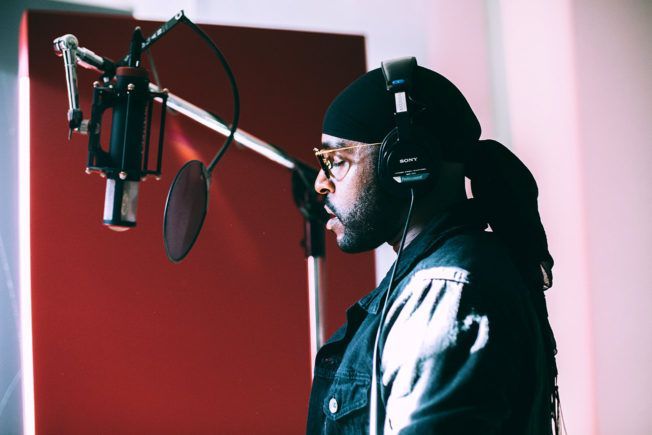
In today’s music world, recording vocals from a home studio is the default setup for many artists. With so much music technology at our disposal, we can all record and produce commercial ready songs right from our bedroom. This guide explains the fundamental strategies used to record vocals using Ableton Live.
Recording Equipment
Before you get into the process of recording vocals, ensure your equipment is ready to go. Here is the basic equipment needed to record vocals:
1. Computer:
Laptop or desktop computer with high specs to avoid crashes.
2. Digital Audio Workstation (DAW):
This guide uses Ableton Live.
3. Microphone:
Condenser microphones work great for recording vocals. There are lots of other options for different budgets as well, so do some research.
4. Audio Interface:
Used to connect studio monitors, microphones, instruments, headphones, and other gear to a computer.
5. Studio Headphones:
Closed-back headphones are better for recording. They prevent audio bleed that the mic could pick up.
Preparing Ableton Live for Recording Vocals
Ableton Live provides two separate views to work with audio: Arrangement View and Session View. For this guide, we’ll work in Arrangement View. Here are the steps to prepare Ableton Live for recording vocals:
Step 1 | Connect Your Microphone to Ableton Live
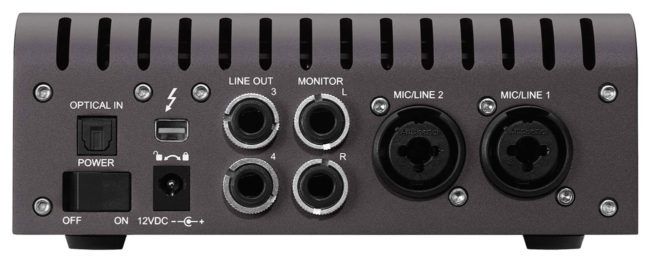
For those using a condenser mic: Connect your microphones XLR cable to an audio interface input. Then turn on the ‘Phantom Power’ (48V) on your audio interface to power your microphone. There is also USB microphones that can connect directly into your computer.
Step 2 | Setup Live’s Preferences
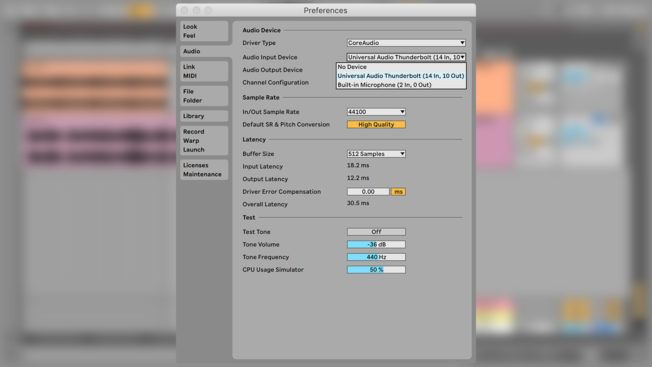
Setup your microphone input in Ableton Live. Go to File > Preferences. With Preferences open, go to the Audio tab and select the ‘Audio Input Device’ chooser. Next, select your audio interface. Also, make sure to select the ‘Audio Output Device’ where your headphones are connected. If you connected them directly to your computer, select ‘Built-in Output.’
Step 3 | Set Your Songs Tempo

Set the tempo of your song. Live’s default tempo is 120 BPM. You can change the BPM from the Tempo control located on the Control Bar. Also, use Live’s Tap Tempo button if you have a specific beat in mind but don’t know the BPM. Click the ‘Tap’ button once every beat and Live will determine the tempo for you.
Step 4 | Enable the Metronome

The easiest way to record in sync is to use the built-in metronome. Enable the Metronome button from the Control Bar. It will begin ticking after hitting the Record or Play buttons.
Step 5 | Create an Instrument Track
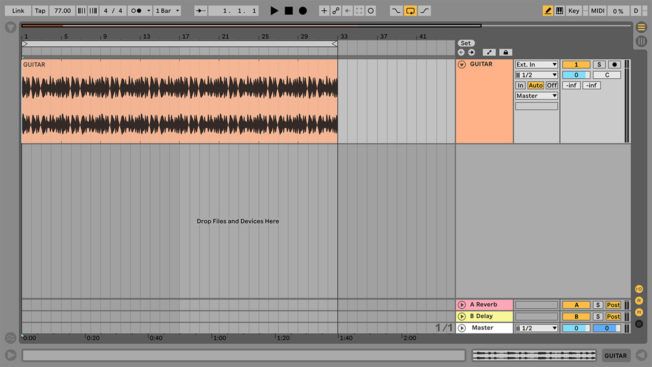
It’s helpful to have a beat or an instrument track playing when recording vocals. I love starting with a guitar track. Piano tracks are also great. Either record an instrument, import a sample loop or use an existing arrangement.
Also, set a loop around the instrumentation or beat if you don’t have a full song or if the instrument track is short. Select a section of the Arrangement and click the Control Bar’s ‘Loop’ switch.
Step 6 | Create an Audio Track for Recording Vocals
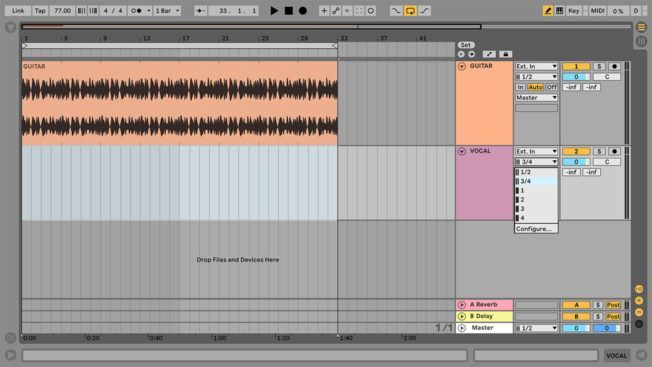
Create a new Audio track for recording your vocals. Click CMD+T [Mac] or CTRL+T [PC].
Open the mixer’s In/Out Section. Select the input for your microphone from the ‘Input Channel’ chooser.
Step 7 | Enable Recording

Record-enable the track by clicking the ‘Arm Arrangement Recording’ button located in the I/O Mixer Section.
Start recording vocals by enabling the ‘Arrangement Record Button’ located on the Control Bar.
Recording Vocals with Audio Effects
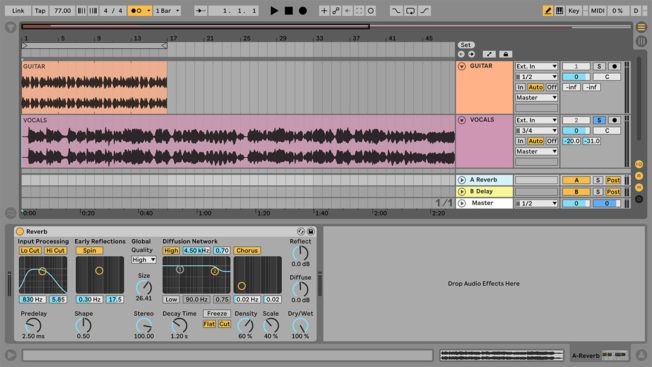
You can also add reverb and delay while you record your vocals. Reverb helps when recording vocals. You could also apply saturation to warm the vocals and compression to smooth out the recording.
Apply audio effects using Sends and Return tracks. This method allows you to treat your tracks with parallel processing. Parallel processing is more effective than inserting effects on the vocal track. Why? It enables you to apply effects while also preserving the original audio signal. For example, Return tracks host the effects devices. Then each track has corresponding Send controls that feed the audio into those effects.
Tips for Recording Vocals
Make the recording process more efficient and effective with these tracking tips. There are different strategies for recording vocals. You can record a full song in one take or record smaller parts. Mixing these strategies also tends to be a very efficient technique. Here is how it works:
Recording a Full Take
I like to start by recording the whole song for at least two takes. Then, I’ll focus on recording separate sections. Recording the song as a whole allows the vocalist to warm up. It also helps them get comfortable with the direction and dynamics of the song. Moreover, recording one take sounds more natural compared to recording separate sections and comping them together.
Recording Short Phrases
A flawless, one-take vocal performance is rare. Many choose to record vocals section by section. This process is known as ‘comping’ which is short for compilation. Have the vocalist run through their parts several times, even if they make mistakes. Keep the recording going. They’ll eventually nail that perfect take. It’s also better to have too many takes than not enough when it comes to editing.
Working with Another Vocalist
When working with another vocalist, ensure you give them feedback after every take. Singing is a challenging task, and recording psychology makes everything a little sensitive. Giving your vocalist constructive feedback can also make them feel more comfortable, and helps them improve their performance.
Managing Your Vocal Recordings
By the end of your recording session, you will have many different takes for editing. Keeping them in large chunks may make your job harder. One way to manage them easier is to chop them into different parts. Split audio clips in Ableton Live with the shortcut CMD+E [Mac] or CTRL+E [PC]. You can also consolidate parts with CMD+J [Mac] or CTRL+J [PC].
The trick is to pick the best takes after recording and combine them to make it sound like one take. Again, this procedure of combining different takes is called ‘comping.’ So, my suggestion before starting to comp a track is to work with a clear and rested mind. Listening to dozens of vocal takes and trying to pick the best one can be challenging. It’s better to have a separate editing session with fresh ears. For instance, I start editing vocal tracks a while after recording them, especially if it was a long recording session.
Final Words
These vocal recording strategies provide a foundation for more advanced techniques. As you improve your music production skills, you’ll discover many different methods to get to the same results. Keep in mind that it takes time and effort to make great songs. The more songs you produce, the better you’ll get. So get started with recording some vocals, and most importantly, have fun making your music!
Turn your passion for music into a Profession: Learn more about our Music School Programs!
MORE ARTICLES FROM THE ICON BLOG

FIND YOUR SOUND, HONE YOUR CRAFT:
Are you ready to turn music into a career? ICON prepares students to become music producers, composers, performers, recording artists, professional DJs, and entrepreneurs in the entertainment industry. Click below to get information about our award-winning programs: