What does quantize mean? Learn what quantization is and how to quantize in Ableton Live with these quick steps.
What Is Quantization in Music?
Quantization is a process used in music production to snap MIDI and audio notes to a fixed grid. This feature is available in most modern Digital Audio Workstations (DAW).
Music producers use this technique to sync notes in time with the host tempo. The notes automatically move to the exact beat and subdivisions set by the user. It’s a fast and efficient way to control or correct the timing of notes.
For example, if a kick drum is slightly behind the beat, quantizing will move it directly on the beat. As a result, the kick drum will play perfectly in time.
How to Quantize in Ableton Live?
Ableton Live ‘s quantization feature is quick and easy to use. This time-saving function quantizes both MIDI notes and audio files.
[yuzo id=”13031″]
How to Quantize MIDI in Ableton Live?
There are three options for quantizing MIDI notes:
1. Recording Quantized MIDI Notes

This function quantizes MIDI notes while recording. First, enable Record Quantization from the Edit menu. Then from the chooser, select which meter subdivision the notes will snap to when recording.
This feature will save you the hassle of fixing notes, not in sync. After recording, you can always add groove to humanize your recordings.
2. Moving MIDI Notes Manually in the MIDI Editor
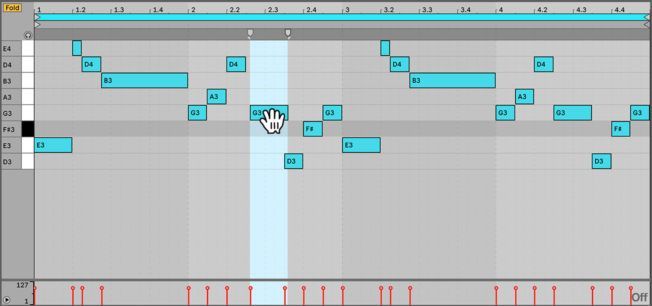
Live’s MIDI Editor offers grid snapping. This feature will snap MIDI notes to the visible grid lines when moving them. It can also be enabled or disabled, depending on your needs.
Manually quantizing MIDI notes is helpful when you want to adjust specific notes rather than every note. For example, fixing the timing of a recording or applying groove by hand.
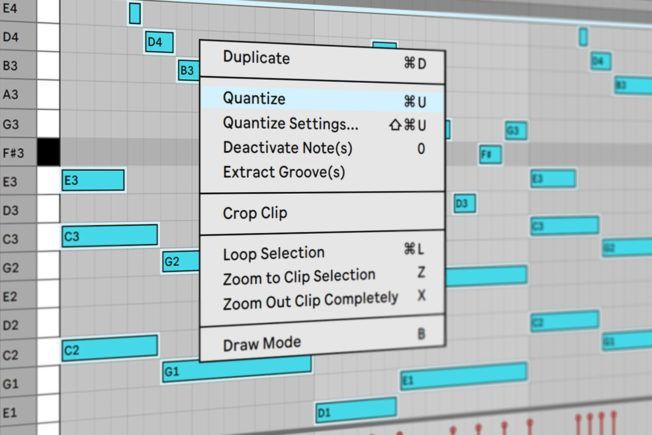
3. Correct Note Timing with the Quantize Command

Live’s Quantize command shifts selected MIDI notes to the grid. For example, quantizing at a 16th note resolution will move the selected notes to the nearest sixteenth note.
Follow these steps to correct the timing of MIDI:
- Select a note or a region of notes in the MIDI Editor.
- Choose the Quantize command from the Edit menu. You can also use the keyboard shortcut CTRL+U (PC) or CMD+U (Mac) . This move quantizes notes using the default settings.
- To adjust your parameters, open the Quantization Settings dialog box from the Edit menu. You can also use the keyboard shortcut CTRL+Shift+U (PC) or CMD+Shift+U (Mac) .
- The Quantization Settings dialog box offers three options. Select the quantize settings that meet your needs:
- Quantize To : Select the current grid size or a specific meter value.
- Adjust Note : Quantizes from either the note start or note end (or both).
- Amount : Moves notes by a percentage of the set quantization value. For example, 100% will force notes to the exact beat. Whereas lesser amounts give you a looser feel.
- Click “Ok” and watch the magic happen!
Applying these techniques to your workflow will save time and ensure your MIDI notes are in time.
How to Quantize Audio in Ableton Live?
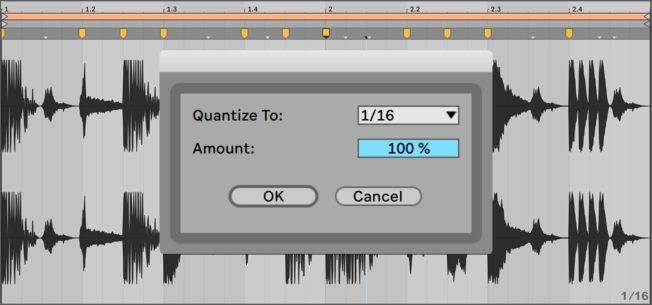
Quantizing audio in Live follows similar steps as MIDI. However, audio files use Warp Markers to adjust the timing along the timeline.
Live’s Quantize command snaps the Warp Markers of an audio sample to the grid. Therefore, it’s crucial to ensure the Warp Markers align with the initial attack of each note. It’s also helpful to delete unnecessary Warp Markers. You will get more accurate results with a little preparation.
Follow these steps to correct the timing of audio:
- Select the proper grid size to ensure the notes snap to the correct beat. For example, select an eighth note grid if you have 8th notes in your melody.
- Click in the background of the Sample Editor to select the audio.
- Choose the Quantize command from the Edit menu or use the keyboard shortcut. This move will use the default settings.
- If you prefer to adjust the parameters first, open the Quantization Settings dialog box from the Edit menu or use the keyboard shortcut.
- Select the settings that meet your needs and click “Ok.”
Live doesn’t always quantize accurately. Double-check the results and manually move Warp Markers to the correct beat on the timeline if needed.
This process will save time from having to adjust dozens of Warp Markers. Imagine having to move every drum hit in a loop manually. With quantizing, you can accurately align all the drum hits to the grid quickly.
Why Quantize Music?
Many ask, “to quantize or not to quantize?” The answer depends on your needs and the timing of recorded tracks.
Consider these four reasons before quantizing your music in Ableton Live:
- Correct the timing of notes after or while recording. This method saves time by quantizing the imperfect notes in real-time. There’s no need to record again if you have timing issues.
- When playing several audio loops, each with different grooves. Having multiple loops with varying amounts of groove sounds sloppy. It’s vital to quantize your audio loops first and then apply the same groove amount to those clips. The result will give you a tighter groove and prevent timing issues.
- Align MIDI notes for parts that play together. For example, a melody and chord progression track with different timing or groove amounts will sound jarring. Quantizing the notes to the grid will make them play together better.
- To achieve ultra-tight grooves when editing samples in Ableton Live. Some genres require tight grooves or hits that land directly on beat. Notes or drum hits that stray off-beat create either a lazy or rushed feel. Consistent timing is vital!
Also, apply these techniques with caution and purpose. Rigid grooves can compromise the “humanization” or “musicality” of your music. The result could also sound unnatural and robotic.
Conclusion
Learning how to quantize will improve your workflow and the quality of your music. It’s also one of the best methods for situations where perfect timing is essential.
However, apply quantization with care and purpose. A song that lacks a groove can feel rigid. Whereas real, human performance has slight timing imperfections that give an expressive feel.
Turn your passion for music into a Profession: Learn more about our Music School Programs!
Join our Newsletter
Get the the latest music industry insights, invites to exclusive events and workshops, and artist spotlights straight in your email.
MORE ARTICLES FROM THE ICON BLOG

FIND YOUR SOUND, HONE YOUR CRAFT:
Are you ready to turn music into a career? ICON prepares students to become music producers, composers, performers, recording artists, professional DJs, and entrepreneurs in the entertainment industry. Click below to get information about our award-winning programs: