How to Move Projects Effectively to Another Computer
Learn how to share or move projects to another computer without problems. This guide shows you how to manage project folders for Ableton Live and Logic Pro X.
How to Save Your Music Project the Right Way
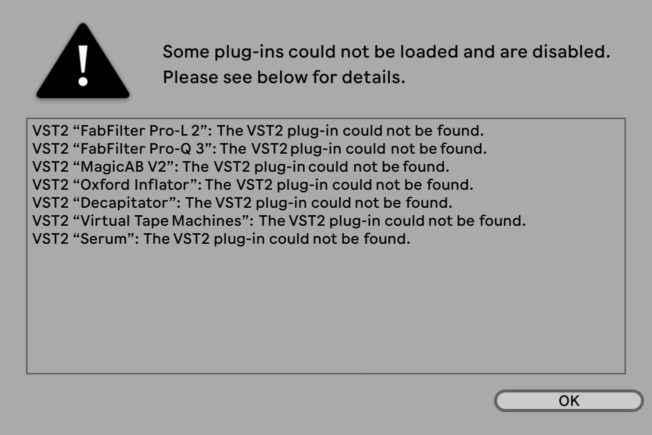
Picture this: Your friend hears an awesome idea you started and wants to collaborate. However, when your friend opens the project on their computer, s/he is greeted with a ton of file missing error messages. Missing samples, plugins, you name it. This scenario can happen when you move projects from one computer to another.
While making music is fun , there are times we must take off our creative hats and put on our administrative hats. This music project management guide will cover two main topics:
1. Understanding a songs project folder and its contents.
2. How to save the necessary files into a project folder to avoid problems when opening it on another computer.
DAW Project Folders
Project folders store all the assets for your music project. They include subfolders that save samples, presets, project data, project settings, saved project versions, and more.
Properly managing project folders is essential. It makes it easier to organize, archive, and move projects.
However, project folders can get large and full of various folders and files. Here is a general breakdown of the project folder contents for Ableton Live and Logic Pro X.
Ableton Live Project Folder
A Live Project folder contains the saved Live Set(s) and all related files. All essential project files must live in this folder to avoid problems.
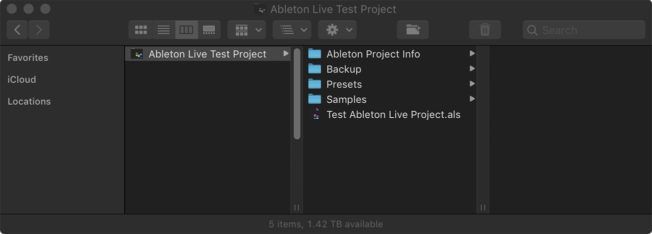
Live will create a new Live Project folder when you save a Live Set for the first time. The folder contains:
- A .als project file that stores the layout of a Live Set. This file includes all clips, tracks, devices, samples, arrangements, and settings.
- An Ableton Project Info folder that contains a project file generated when saving the project for the first time. You should not modify this folder or its contents. It stores important project data.
- A Samples folder that stores all the samples imported into your project.
- A Backup folder that stores backup .als versions of your project.
- A Presets folder that saves imported Max for Live devices.
Note: Save each Live Set you create in its own individual Live Project folder. You shouldn’t save multiple songs or Live Sets in the same Project folder. Saving different Live Sets inside the same Live Project folder will cause critical file management issues and slow down Live.
Logic Pro X Project Folder
A Logic Pro X project contains all of your recordings, the location of media files, backups, and changes you make. It can include assets such as audio and video files, sampler instruments and samples, reverb impulse responses, presets, and more.
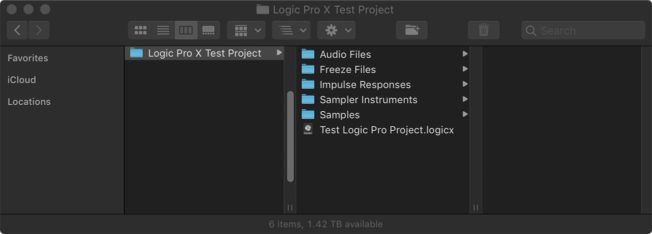
Logic Pro X will create a new project folder when you save a project for the first time. The folder contains:
- A . logicx project file that contains project files and settings. It can include edits to your MIDI and audio, parameter settings, information about the audio and video in your project, and more.
- An Audio Files folder that stores all the audio assets imported into your project. It can contain audio recordings, audio Apple Loops, and other imported audio files.
- A Freeze Files folder that saves temporary freeze files created during the freezing process. You usually won’t need to access these freeze files.
- A Samples folder that stores all the samples imported into your project.
- Other folders such as Impulse Responses and Ultrabeat Samples may also exist if you use Logic Pro X sampler instruments or effects. Saving these devices will create folders that store their respective audio sources.
Note: Logic Pro X gives you the option to save a project as a folder or package. The folder option will place all assets in corresponding subfolders within the project folder. The package option saves all the project assets and settings in a self-contained file. To see its contents, right-click on the package and select “Show Package Contents.”
How to Move Projects to Another Computer
Let’s say you want to move your music project to another computer. How would you ensure all samples, imported audio, plugins, presets, and settings transfer without getting error messages?
There are two main things to consider when moving a music project to another computer: the plugins and samples used in the project. The tips below ensure your projects and all associated assets will work on another computer:
Plugins: AU and VST
Plugins can cause several compatibility problems. For example, not everyone has the same plugins as you. Also, the plugin versions could be different on another computer. Consider these tips when using AU and VST plugins:
On an operating system level, AU plugins will only work on OSX. VST plugins are compatible with both OSX and Windows. If you move projects between OSX and Windows, it’s best to use VST plugins to avoid compatibility problems. However, if you’re moving between two Apple computers, then sticking with AU is fine.
Additionally, it’s smart to make sure the plugins on both computers are the same version to avoid problems. This helps prevent crashes and ensures presets load correctly.
Moreover, if you’re collaborating with someone that does not have the same plugins, consider “freezing” your tracks. It’s a good practice to freeze tracks that have third-party plugins. That way, someone without your plugins can open the project and still be able to work with it.
Lastly, if you work on multiple computers, try setting them up as identical as possible. Use the same DAW, plugins, and OS version. This will reduce the chance of problems arising.
Freezing Tracks and Committing to Audio
Freezing tracks and committing them to audio renders the original track and all the processing to a new audio file. Both Ableton Live and Logic Pro X have commands that will freeze midi and audio tracks.
There are a variety of reasons you would freeze a track. But for this topic, consider freezing a track if:
- Another computer does not have the same plugins.
- Another computer has a different type or plugin version. For example, AU instead of VST or a newer version of the plugin.
- Another computer doesn’t have the processing power to run a large project.
The Difference Between Freezing and Committing to Audio
There are notable differences between the two processes:
Freezing a Track
Freezing temporarily renders the track and all devices to a separate audio file. The process is not final until you commit the audio. You can still unfreeze the track to make edits. Moreover, many editing functions remain available to tracks that are frozen.
A frozen track can also be opened on another computer that doesn’t have the same plugins on that track. However, editing a frozen track is limited. Mixer controls such as volume, pan, and the sends are still available. Although, Ableton Live allows some clip and automation editing not available in Logic Pro X.
Commit to Audio
Committing a frozen track to audio completely replaces the original track with a new audio file. All the devices and processing get rendered. For example, committing a midi track to audio will replace all the midi notes with an audio waveform. This process is called “Flattening” in Ableton Live and “Bouncing in Place” in Logic Pro X.
How to Freeze and Flatten in Ableton Live
Ableton Live has “Freeze Track” and “Flatten” commands available from either the Edit menu or right-click context menu.
Freeze a track by right-clicking the track and choosing “Freeze Track” from the context menu.
Flatten a track by right-clicking the frozen track and choosing “Flatten” from the context menu.
How to Freeze and Bounce in Logic Pro X
Logic Pro X has two Freeze Modes: Source Only and Pre Fader. You can select the Freeze Mode from the Track Inspector.
- Source Only will render the audio file or the virtual instrument and not the effects.
- Pre Fader will render everything, including the effects.
Select Pre Fader mode if you are moving the project to another computer. Next, freeze a track by pressing the snowflake button on the Track Header. After that, click play to freeze the track. A green snowflake button will indicate a frozen track with Pre Fader mode.
Note: The Track Freeze button is not visible by default. Make it visible by right-clicking the Track Header, choosing Track Header Components, and selecting Show Freeze. A snowflake button will appear on the Track Header.
Bouncing a Track in Place
Unlike Ableton Live, Logic Pro X allows you to commit to audio without first having to freeze. Commit a track to audio in Logic Pro by selecting the track and clicking Control+Command+B. Next, click OK on the following “Bounce Track in Place” window to render the audio to a new audio track.
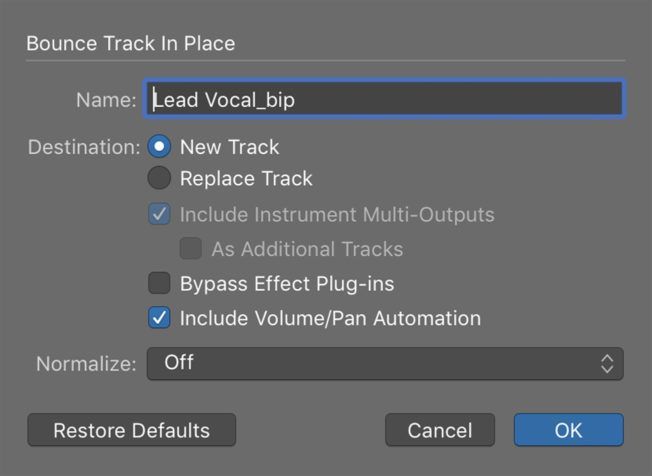
Note: Keep “Off” selected in the Normalize drop-down menu. The other settings will render the audio in a way that does not match the original playback.
Samples: Collecting and Saving all Associated Files into the Project Folder
Ableton Live and Logic Pro X do not automatically copy media files into a project folder. Instead, they both reference the files in their original location to save space.
If you send someone a project or transfer the project to a different computer, it’s vital to collect and save all audio assets into the project folder. This crucial step will copy all external media files used in the project to subfolders within your project folder. It will also prevent missing file error messages when opening the project on another computer.
Note: This step does not copy and save third-party plugins. It only saves audio files such as samples, recordings, sampler instrument samples, reverb impulse responses, etc. Moreover, this collection of audio assets can drastically increase the project folder size depending on the files used in a project.
Follow the steps below to collect and save audio files in Ableton Live and Logic Pro X:
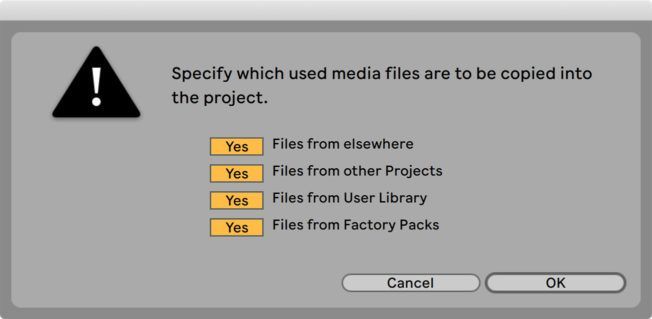
Ableton Live: Collect All and Save
Ableton Live’s “Collect All and Save” function will copy all used audio files and Max for Live devices into the project folder.
Collect project assets by clicking File > Collect All and Save.
From the following dialog box, select which media files to copy into the project folder and click OK.
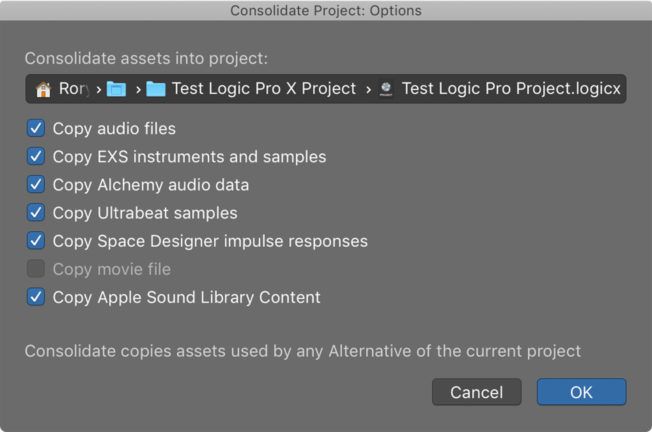
Logic Pro X: Consolidate
Logic Pro X has a “Consolidate” command that creates a consolidated copy of a project with all audio assets.
Consolidate project assets by clicking File > Project Management > Consolidate.
From the following dialog box, select the file types you want to copy into the consolidate project and click OK.
Conclusion
Following the steps in this guide will ensure your music projects include all the necessary assets. You can now safely share or move projects to another computer with minimal-to-no problems. These steps also make it easier to organize, archive, and move projects.

MORE ARTICLES FROM THE ICON BLOG


