How to Use Ableton Live Vocoder on Vocals and Drums
This guide introduces the Ableton Live Vocoder effect and shows you how to use it on vocals and drums. You’ll learn how to set up the device, create classic robotic vocal effects, and layer drum sounds.
Ableton Live V ocoder Overview
Ableton Live ‘s vocoder is a versatile effect that modulates incoming signals in creative ways. It can shift frequency formants, generate harmonic distortion, apply synthesized melodies and harmonies to vocals, and much more.
Vocoding uses frequencies of one sound to modulate the frequencies and character of another. The process requires two sound sources to work, a modulator and a carrier.
The modulator source is generally something with a clear rhythmic character such as vocals or drums. The carrier is typically a harmonically-rich synthesizer sound such as a string or pad.
For example, traditional vocoders create the popularized “singing synthesizer” and other robotic voice effects. Daft Punk’s 1997 hit ‘Around the World’ is a familiar example of a classic vocoder sound.
Vocoder on Vocals
Modulating vocals to get that classic robotic voice sound requires some setup and audio routing. To set this up in Ableton Live:
- Load Vocoder on the track with your vocal material. You can either use a vocal sample or process a live vocal signal through a microphone.
- Create a MIDI track with the shortcut command Shift+CMD+T.
- Drop any synthesizer on the MIDI track. This example uses Live’s Operator instrument.
- Create a new MIDI clip with the shortcut command Shift+CMD+M. You can draw MIDI notes to drive the synthesizer or record them in by playing live.
Note: If you’re drawing MIDI notes into the Note Editor, then try using chords in the same musical key as the vocals for best results. If you’re recording the synthesizer and vocal material in real time, then make sure the Arm button is enabled on both tracks.
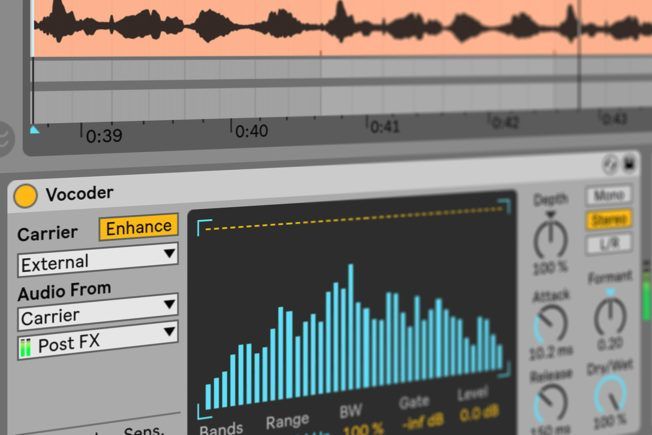
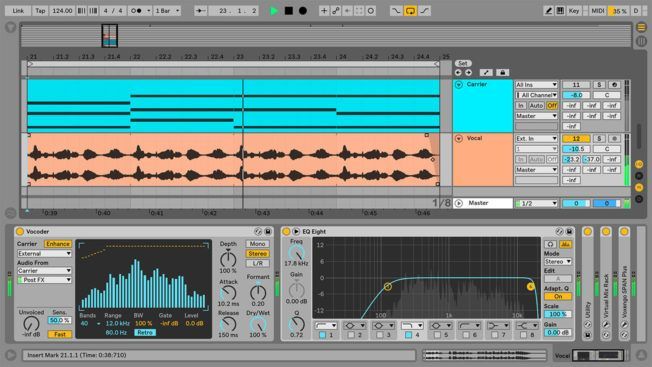
- Set Vocoder’s Carrier chooser to External. This option allows you to route the audio from the synthesizer track.
- Select the synthesizer track from Vocoder’s Audio From chooser. Also, select Post FX from the bottom chooser.
- Playback both tracks to hear the timbral character of the synthesizer transform the vocals. To hear the vocoded signal alone, mute the synthesizer track.
- Dial in your synthesizer sound to get the desired effect. Synthesizer sounds that are bright and rich in harmonics often produce the best results. Also, try sawtooth-based synth patches to improve the clarity of the voice.
Vocoded Vocal Example:
Processing Vocals with Vocoder
The Ableton Live Vocoder comes equipped with several sound-shaping controls. Try experimenting with them to dial in the effect further. Here is a brief breakdown of some controls that will improve the results:
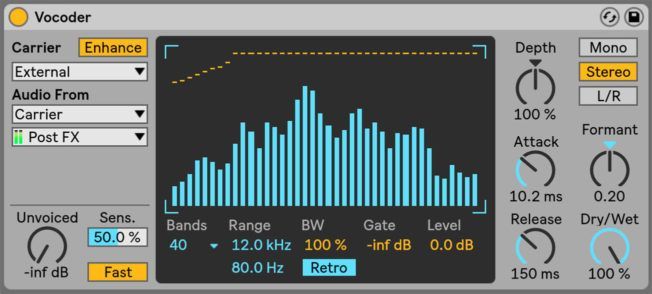
Enhance: Vocoder’s output often loses high-end and clarity when using external carrier sources. Enabling the Enhance button brightness the sound by normalizing the carrier’s frequencies and dynamics.
Unvoiced: This control adjusts the volume of a noise generator, which resynthesizes portions of the modulator signal. Adjusting this control will also add brightness and clarity.
Filter Bank: Vocoder’s central display shows the levels of the individual bandpass filters. Click and drag them to attenuate these levels. This feature also works as a built-in EQ. However, it is often easier to use a separate EQ to shape the sound.
Bands: This chooser sets the number of filters that affect the sound. Higher number bands sound more clear while lower bands sound more distorted. This example is set to 40 bands for greater clarity.
Precise/Retro: This switch toggles between two filter types. Precise mode sounds wider, more full, and sometimes bass heavy. Whereas Retro mode sounds narrower and louder at higher frequencies.
Depth: This control sets how much of the modulator’s amplitude envelope is applied to the carrier’s signal. At 0%, you will only hear the processed synthesizer. 200% only plays the high amplitude peaks of the vocal. 100% combines them resulting in classic vocoding.
Attack and Release: The Attack control sets how quickly Vocoder responds to amplitude changes. Release adjusts how long the filter bands will hold their amplitude before dropping to zero.
Formant: This control shifts the carrier’s filterbank frequencies up or down. For example, Formant changes alter the apparent gender of the source. Lower values sound deep like a male while higher values sound brighter like a female.
Vocoder on Drums
The Ableton Live Vocoder has several creative uses other than treating vocals. In particular, Vocoder works great at enhancing drums and percussion using its noise oscillator. This Carrier type is useful for layering drums with white noise to thicken them up, give them more character, and help them cut through the mix better. Moreover, this layering technique works especially good on hi-hats and snares.
When treating drums with Vocoder, you can either insert the device directly into the tracks device chain or run the effect in parallel with an Audio Effect Rack or return track.
For this example, we’ll set up an Audio Effect Rack and run Vocoder on a parallel chain to treat a snare. This technique makes it easy to blend the harmonic/timbral signal with the original. Moreover, this approach allows you to go wild with the processed signal while preserving the rhythm and dynamics of the original signal. Let’s look at how to set this up in Ableton Live:
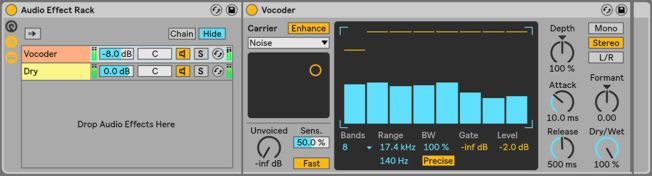
- Load Vocoder on a snare track and use the shortcut command CMD+G to group the device in an Audio Effect Rack.
- Expand the Chain List and create a second chain. One chain will be the processed signal and the other a dry, unaffected signal.
- Set Vocoder’s Carrier chooser to Noise. This option uses Vocoder’s internal noise generator as the carrier source.
- Playback the snare and dial in the sound with Vocoder’s controls.
Processing The Snare with Vocoder
- The X-Y display allows you to adjust the character of the noise. Click and drag the control to change the sample rate and density of the noise.
- Enable Enhance to normalize the noise frequencies and dynamics for a more controlled sound if needed.
- Set the number of filter bands that affect the sound. Lower number bands sound more like the natural raspiness of snares. This example uses 8 bands.
- Switch between the Precise/Retro filter types to hear what sounds better with your material. For this example, Precise mode sounded wider and more realistic. Retro mode sounded brighter and narrower.
- Adjust the Range sliders to cut unnecessary frequencies. For this example, the white noise sounded too bright, and there were a lot of low frequencies masking the dry signal. I cut some high and low frequencies to improve clarity.
- Adjust the Attack and Release to taste. Adding some Attack makes room for the initial hit of the dry signal to come through more clearly. Release adjusts the tale length of the snare. Longer release times create longer snare tails.
- Lastly, play around with the Depth and Formant controls to shape the sound further.
Layered Snare Example:
Ableton Live Vocoder Mix
Conclusion
The Vocoder techniques outlined in this guide are only two of many other creative uses. This multipurpose effect can be used to manipulate all types of audio in various ways. It is encouraged to experiment with it and unlock its vast potential.

MORE ARTICLES FROM THE ICON BLOG


