10 Easy Tips for Editing MIDI Notes in Ableton Live
Learn how to work with MIDI notes in Ableton Live. This guide looks at ten creative MIDI editing techniques that will improve your music composition workflow.
Editing MIDI Notes in Ableton Live
Among Ableton Live ’s many versatile features is the unique ability to create and edit MIDI notes. Ableton Live offers various MIDI editing tools that make it easy to manipulate the harmonic or rhythmic content of a MIDI clip.
Discover new ways to create music and improve your workflow with the MIDI editing techniques outlined in this guide.
What is MIDI in Ableton Live
A MIDI clip in Live contains notes and controller data for playing a MIDI instrument. This instrument can be a virtual instrument or an external hardware instrument.
The MIDI clip also provides the device with a musical score to play. It includes note pitch, length, position, and velocity information. Moreover, MIDI is composed and edited in Live’s MIDI Note Editor.
1. Record MIDI Note Output From MIDI Effects
Ableton Live comes with a selection of MIDI effects. Devices such as Arpeggiator, Chord, Scale, and Random generate new note sequences, chords, or rhythmic patterns from incoming notes. Generating notes with these devices is a great way to discover musical ideas you may not have imagined.
However, the MIDI notes these devices output are not visible. You must record the MIDI note output on another track to edit the notes.
Follow these steps to record the MIDI note output from MIDI devices:
- Create two MIDI tracks. The first track contains the MIDI effect and an instrument. The second track will record the MIDI note output for editing.
- Set up the second track for recording. Access the In/Out Section and select the instrument track from the ‘MIDI From’ chooser. Make sure the Monitor section is set to ‘In,’ and then arm the track for recording.
- Record the results. Trigger the clip on the instrument track and then click the Record Button in any clip slot on the recording track.
2. Multi-Clip Editing
One of the most exciting new features in Ableton Live 10 is multi-clip editing . You can now work with MIDI clips across multiple tracks within the Note Editor in both Session and Arrangement View.
Multi-clip editing helps you see melodic and rhythmic relationships between different clips. This ability is useful when creating and refining musical ideas. It also allows you to compare and edit MIDI clips across separate tracks quickly. In addition, you can select and edit multiple clips within the same track.
With multi-clip editing, you can select and view up to eight MIDI clips simultaneously. When multiple MIDI clips are selected:
- All the notes from each clip are visible in the Note Editor. However, only one clip will be active for editing at a time.
- Loop bars will appear above the Note Editor. Each loop bar represents a different clip.
- Hovering the mouse over an inactive clip’s notes or loop bar will reveal that clip’s color. This function helps you to choose a different clip to edit. Also, clicking on a clip’s note or loop bar switches to that clip for editing.
- The title bar will show the name of the clip selected for editing. This feature is useful for identifying different clips with the same color.
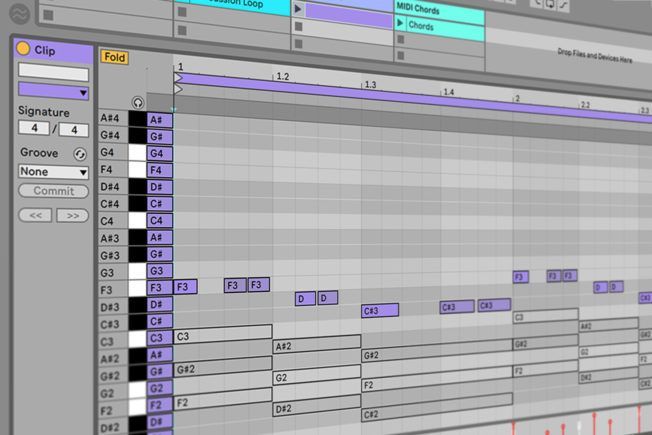
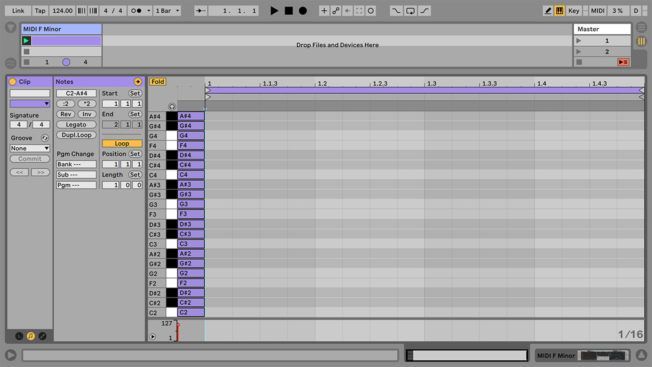
3. Fold the MIDI Note Editor to any Scale
Ableton Live’s MIDI Note Editor makes it easy to display all the notes of a particular scale with the ‘Fold’ button. This technique ensures all the notes you choose will be harmonically correct. It also makes it easier to create harmonies and melodies. Especially, if you have little music theory knowledge!
Use the MIDI Note Editor as a scale reference guide with these steps:
- Create a MIDI clip and draw all the notes of the scale you want to play in.
- Copy and paste all the notes to the octave above and below to give you more range.
- Activate the Fold button to hide all the rows without MIDI notes.
- Select all the notes and move them left of the start marker. This move places the notes outside the active grid so they won’t play.
4. Capturing MIDI
Another exciting feature added in Ableton Live 10 is Capture MIDI. Live is always listening to MIDI input on armed or input-monitored tracks. Capture MIDI lets you retrieve the material you’ve just played on those tracks. This feature is useful if you forgot to press the Record button before playing. It also lets you improvise or experiment freely without the stress of recording.
To capture the MIDI notes you just played, press the Capture MIDI button. Live will create a MIDI clip containing the notes you recently played. It even works when playback is stopped. No more losing ideas if you forgot to record!
Capture MIDI also functions differently depending on the state of the Live Set. Learn more about these different behaviors at the Ableton website.
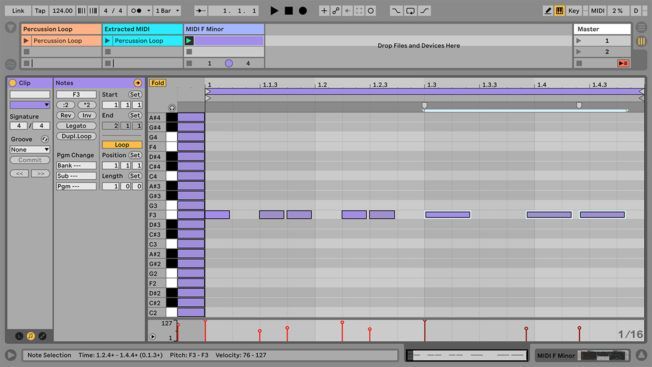
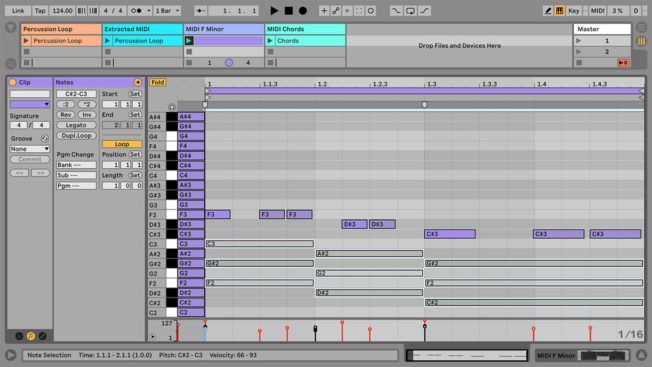
5. Extracting Grooves to Create MIDI Patterns
The timing and volume information from any audio or MIDI clip can be extracted to create a new groove. You can apply the extracted groove in the Groove Pool to clips in your project. However, you can also use the extracted MIDI to create a new musical idea.
For example, take a percussion loop, extract the groove, and use the extracted MIDI to build a bassline pattern. The extracted groove will give you a rhythm. Edit this rhythm by moving the MIDI notes to different pitches.
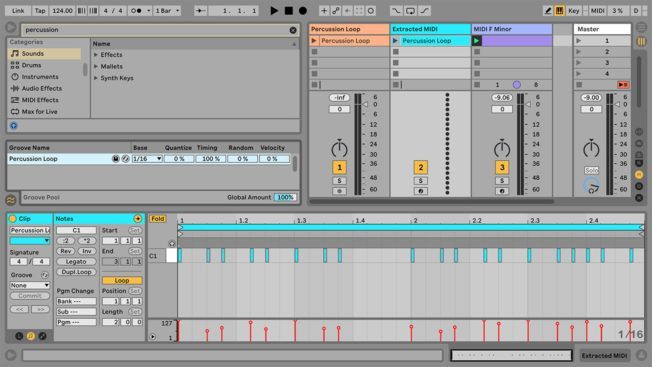
Use extracted grooves to create new MIDI note patterns with these steps:
- Drag and audio clip into Session View or Arrangement View.
- Right-click the audio clip and choose ‘Extract Groove(s)’ from the context menu.
- Open the Groove Pool and drag the extracted groove onto a MIDI clip.
- The extracted MIDI clip will contain a rhythmic pattern of notes. Create a new pattern by pitching various notes up or down. You can also use the transform tools. Try stretching, inverting, and reversing notes. Last, duplicate the loop and edit it further to create variation.
6. Stretching MIDI Notes
Ableton Live’s MIDI Note Editor makes it easy to shorten or lengthen MIDI notes. The MIDI Note Stretch feature allows you to scale multiple notes or a range of time. You can quickly adjust MIDI notes without having to edit each note to make them work in your project. It’s also a fun way to create rapid arpeggios or half-time rhythms!
Time stretch MIDI by selecting multiple notes or a range of time in the Note Editor. Note Stretch markers will appear, allowing you to scale the notes by dragging them horizontally. This technique is similar to warping audio.
Also, when the mouse is between the Note Stretch markers, a ‘pseudo’ stretch marker will appear. Dragging this marker stretches or compresses the material between the fixed markers. This move allows you to edit notes without affecting the material outside of them.
7. Deactivating MIDI Notes
Ableton Live allows you to deactivate or mute MIDI notes. Deactivating notes is an excellent way to experiment with grooves. It also makes it easier to reference multiple MIDI note patterns from different tracks in one place. For example, you can visually build a lead melody around a chord progression. Start by copying and pasting the chord MIDI notes into the lead MIDI clip. Then, deactivate all the chord notes by selecting them and clicking ‘0’ on your keyboard. You can now reference the note patterns without hearing them.
This method also works for analyzing note placements between two or more tracks. Seeing all the notes from multiple tracks makes it easier to identify notes out of sync or other issues. You can also achieve this with the multi-clip editing feature.
8. Invert and Reverse MIDI Notes
Ableton Live offers various MIDI transform tools in the Clip Box. They allow you to manipulate the notes within a MIDI clip. Two of these tools are Invert Notes and Reverse Notes.
- The ‘Rev’ button reverses the note selection. The last note swaps places with the first note.
- The ‘Inv’ button flips the note selection upside-down. The highest note swaps places with the lowest note.
The Invert and Reverse controls can also affect selected notes or a time range. If nothing is selected, they transform the entire clip. They work excellent for creating or auditioning variations. For example, you could copy a bass pattern and invert it to create a lead pattern. You can also use the same technique with the Reverse control.
9. Converting Audio to MIDI
Ableton Live’s features four conversion commands that convert audio into MIDI. They make it easier to discover, edit, and create new musical ideas. You can transform monophonic melodies, polyphonic harmonies, and drum beats into MIDI clips.
There are endless audio samples and sample packs available across the internet. With Live’s conversion commands, you can transform original audio into something new or unique. For example, you can resequence MIDI patterns, rearrange notes and chords, pitch notes, cut sections, and more.
There are two ways to convert audio to MIDI. Select the audio clip and choose a command from the Create Menu or right-click the clip to open the context menu.
Here are the four conversion commands:
Slice to New Midi Track
This command divides the original audio into slices and assigns them to MIDI notes in a Drum Rack. A new MIDI track is also created, containing a MIDI clip with one note for each slice.
This method opens many new editing possibilities. For example, you can resequence the slices to create new patterns. Also, each slice lives on its own chain in the Drum Rack. So, you can process the individual slices with different audio effects. You could also try inserting MIDI effects before the Drum Rack to generate ideas. For instance, the Arpeggiator and Random devices can create exciting results.
Note: Slicing differs from the other Convert commands. It uses the original audio to generate sound. The other commands create a MIDI clip that does not play the original sound. Instead, they extract the notes and use them to play an entirely different sound.
Convert Harmony to New Midi Track
This command identifies the pitches in polyphonic audio and creates MIDI notes for them on a new MIDI track. The track also comes preloaded with an Instrument Rack that plays a piano sound.
Convert Melody to New Midi Track
This command identifies the pitches in monophonic audio and creates MIDI notes for them on a new MIDI track. The track also comes preloaded with an Instrument Rack that plays a synthesizer sound.
Convert Drums to New Midi Track
This command extracts the rhythms from percussive audio and creates MIDI notes for them on a new MIDI track. The command also attempts to identify kick, snare, and hi-hat sounds. It then places them into the new clip, so they play the appropriate sounds in the preloaded Drum Rack. Live also places any additional sounds on a silent note lane for manual editing.
10. Duplicating MIDI Loops
Another useful transform tool in the Clip Box is Duplicate Loop. This control doubles the loop brace and the MIDI notes within the loop.

Duplicating a loop makes it easier to develop ideas and create variation. For example, create a simple 2 bar drum pattern, duplicate the loop, change or add a few notes, and repeat the process. It’s a fast way to transform a simple idea into something more interesting. Also, try this technique on chord progressions, basslines, leads, arpeggios, and any other material.
Conclusion
Experiment with the MIDI note editing techniques outlined in this guide to create new musical ideas. You may discover creative methods to use Live’s MIDI editing tools in unconventional ways. Happy music making!

MORE ARTICLES FROM THE ICON BLOG


