the logo for icon collective is yellow on a white background .

How to Energize Your Drum Fills in Ableton Live


This guide looks at an effective technique popularized by Kermode that quickly generates drum fills in Ableton Live. Includes a free Tom Fills sample pack download!

What are Drum Fills?

Drum fills are short phrases played during breaks in the main groove to energize the transition between sections of a song. They also signal a change coming in the song as well as create an exciting tension-release dynamic.

Download “Tom Fills Sample Pack”

Tom-Fills-Sample-Pack.zip – Downloaded 1895 times –

Drum fills can be simple or complex and vary in length. The creative direction is up to you and the style of the song. Moreover, drum fills are created with any combination of drum sounds that are not usually part of the main drum groove.

Additionally, fills are not limited to drum samples. Fills can be created with any sound such as bass hits, recorded material, and anything else that works with your music.

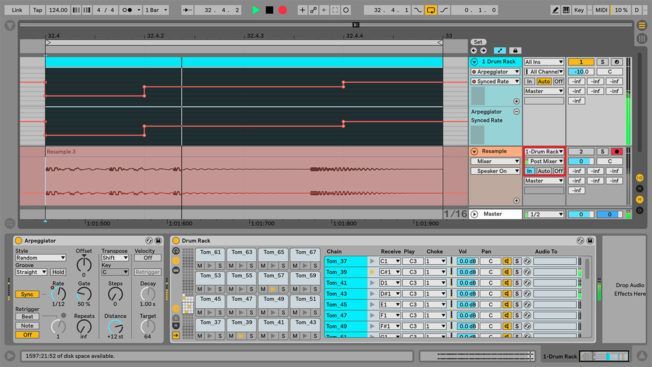
Generating Drum Fills in Ableton Live

This technique credited to Kermode at Cymatics uses Ableton Live ‘s Drum Rack and Arpeggiator to quickly generate compelling drum fills with little effort. Let’s look at the set up:

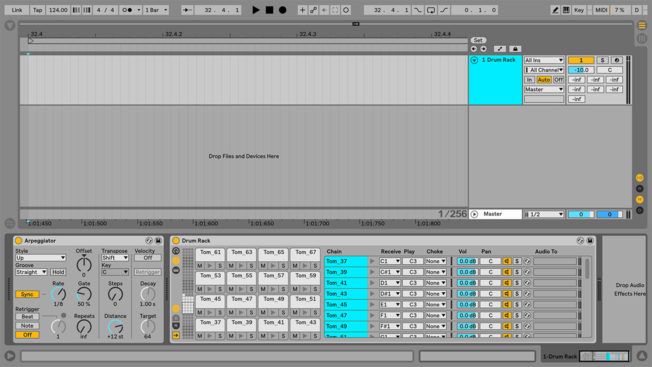
  • Start by creating a MIDI track with the shortcut command Shift+CMD+T.
  • Load up Live’s Arpeggiator and Drum Rack on the new MIDI track.
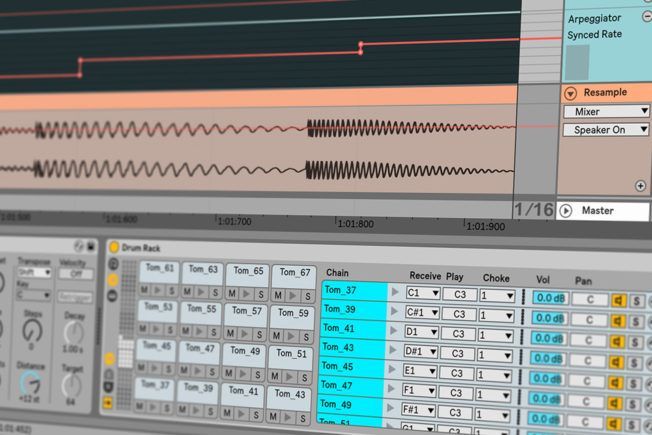
  • Fill the Drum Rack pads with a selection of samples. For this example, we’ll drop in a variety of tom samples.
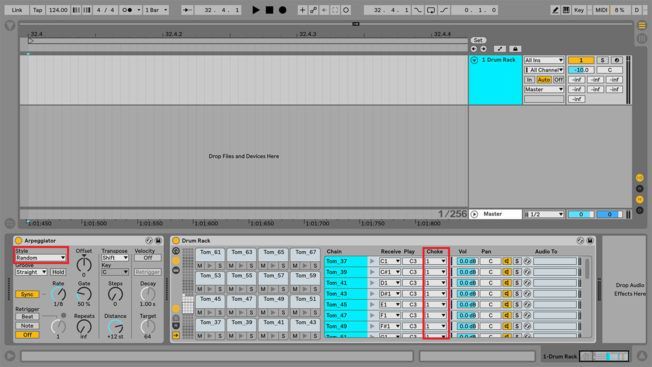
  • Select all the samples from the Drum Rack’s ‘Chain List’ and assign them to the same choke group. Any chains in the same choke group will silence the others when triggered. This approach stops sounds or loops from playing over each other.
  • Set Arpeggiator ‘Style’ chooser to ‘Random.’ This style produces MIDI notes sequences that randomly trigger the Drum Rack pads.
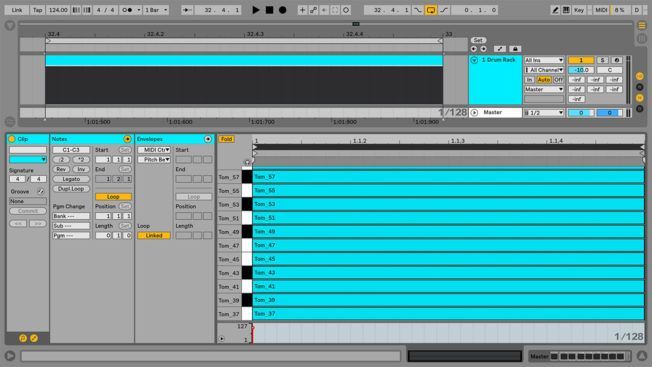
  • Creating a new MIDI clip with the shortcut command Shift+CMD+M.
  • Select the new MIDI clip and fill the entire Note Editor with sustained MIDI notes. Arpeggiator works its magic by generating rhythmical patterns from the held notes.
  • Create an audio track with the shortcut command CMD+T.
  • Select ‘Resampling’ or the Drum Rack MIDI track from the audio tracks ‘Input Type’ chooser and set the ‘Monitoring’ switch to ‘In.’ These setting enable you to record the audio from the Drum Rack MIDI track.
  • Set a loop around both the MIDI and audio tracks.
  • Arm the audio track for recording, click the Arrangement Record button, and hit play to hear the results.
  • Automate Arpeggiator’s ‘Rate’ control to adjust the show fast the drum samples will trigger. Play around with the different beat divisions to hear what sounds best in your song.

Bonus Tip: Keep loop recording going to generate a string of fills you can chop up to create a drum fill sample pack.

Conclusion

The methods outlined in this guide are not limited to creating drum fills. Load up Drum Rack with various other sounds to create unique sequences. For example, drop in a few different hi-hat samples and play with Arpeggiator’s controls to create a variety of hat loops. You could also try generating bassline sequences. The creative direction is in your hands! As a bonus, we included 30 ready to use 24-bit tom fills that are already mixed and tempo labeled.

Join the ICON Collective Newsletter:

MORE ARTICLES FROM THE ICON BLOG

24 Apr, 2024
Crafting a sustainable music career requires clear planning and a solid blueprint. Ensure your music career goals are specific and measurable.
By Florian Radke 06 Dec, 2023
Mastering is the final stage of the music production process, and it can make all the difference between an amateur sounding mix and a professional, radio-ready track. As the last creative step before distribution, mastering polishes a mix and prepares it for the listener's experience across various playback systems. While mixing involves balancing and processing individual tracks, mastering takes a holistic approach. Mastering engineers use specialized tools and global adjustments to enhance the overall sound quality, consistency, and perceived loudness of a song. Their expertise and fresh ears provide an objective perspective on giving mixes the final touches they need. This guide breaks down the art of mastering into "4 C's" - clarity, consistency, color, and clipping/loudness. Understanding these concepts is key to elevating mixes and achieving professional masters. Whether you're a producer looking to DIY master your own tracks or better communicate with mastering engineers, the 4 C's provide a framework for success. I. Clarity Clarity refers to how clearly the listener can hear all the individual elements and details in a mix. It enables the message and emotion of the music to shine through. Mastering should enhance clarity by ensuring nothing obscures the core instruments and vocals. Equalization (EQ) is essential for boosting clarity during mastering. Strategic EQ can attenuate problem frequencies that clutter or mask other elements. For example, a dip at 400-600Hz could tame muddy bass buildup, while a boost at 2-4kHz could increase vocal presence. Subtle EQ moves of 1-2dB can make a notable difference. Multiband compression also helps increase clarity on specific frequency ranges. Compressing the low mids around 300-500Hz can tighten and control muddy resonances, cleaning up the low end. Gentle compression on highs above 10kHz can add sizzle and detail. The key is to compress transparently, avoiding pumping artifacts. Modern mastering tools like iZotope’s Ozone provide dedicated modules for honing clarity. The “Spectral Shaper” applies smoothing EQ to suppress resonances and masking. The “Vintage Tape” module smooths out peaks and enhances punch. Used subtly, these processing tools can work wonders for opening up a dense mix.  A case study in exemplary clarity is the mastering on Daft Punk’s 2013 album “Random Access Memories.” Despite the record’s density of instruments and arrangements, every element shines through in a clean, polished way. The mastering perfectly complements the pristine production quality.
By Florian Radke 01 Dec, 2023
Explore Rick Rubin's minimalist music production ethos, highlighting his work with Johnny Cash and Adele, and how his "less is more" approach revolutionizes music’s emotional impact.

FIND YOUR SOUND, HONE YOUR CRAFT:


Are you ready to turn music into a career? ICON prepares students to become music producers, composers, performers, recording artists, professional DJs, and entrepreneurs in the entertainment industry. Click below to get information about our award-winning programs:

LEARN MORE
Share by: