Icon Instructor Jerry “BigJerr” DiPhillippo takes you into Ableton Live 10 for a first look exploration of what’s new in this highly anticipated release.
Live 10 Feature Highlights
The highly anticipated release of Ableton Live 10 brings some significant improvements, feature enhancements and additions, bug fixes, and much more.
Icon Instructor Jerry “BigJerr” DiPhillippo takes you into Live 10 to highlight some of the inspiring new improvements and features. This milestone release packs a lot; we’ve only begun to scratch the surface. So stay tuned for more videos that will offer a more in-depth look into Live 10 and Push!
Modernized User Interface

More aesthetically pleasing than ever before. Ableton modernized Live’s GUI with a minimalistic flat design. The new look emphasizes usability by sporting clean and simple user interface elements. In addition, there is a new color palette, updated clip appearance, five additional themes, and so much more. There is also a new Ableton Sans font that ties everything together.
New Wavetable Instrument
Live 10 introduces a new instrument to its expanding list of music makers. Wavetable is a synthesizer that combines two wavetable-based oscillators, two analog-modeled filters, and a powerful modulation system. This modern synth offers a selection of advanced sound sculpting controls and flexible modulation options. Moreover, this thing is capable of producing harmonically rich and sonically complex sounds with little effort.
New Audio Effects
Live 10 introduces three new Audio Effects to expand Live’s arsenal of music tools even further.
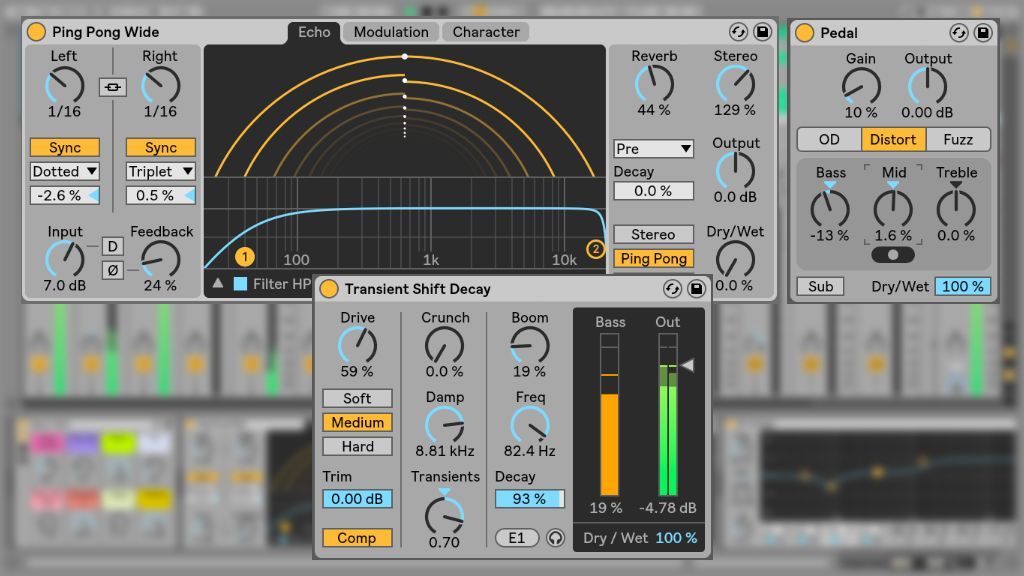
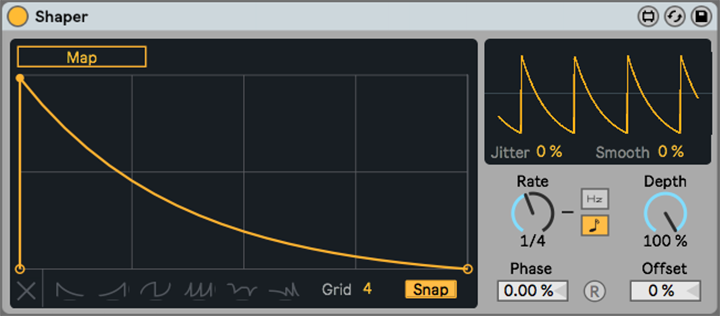
Echo
Echo is a full-featured modulation delay capable of producing a variety of sounds from vintage tape-saturated echoes to modern digital delays. The device features three tabs loaded with a selection of sound-shaping controls:
The Echo tab displays Highpass and Lowpass filter controls. There are also several global controls accessible outside the main display. To the right, there are controls for mixing in reverb, increasing stereo width, adjusting the level, and controlling the Dry/Wet mix. In addition, there are three delay types: Stereo, Ping Pong, and Mid/Side. The left side of the display offers two independent delay time controls, a single feedback inversion switch, and a distortion switch. There is also controls for adjusting the Input and Feedback.
The Modulation tab sports an LFO that modulates both filter frequency and delay time as well as an envelope follower capable of mixing in with the LFO.
The Character tab offers Noise and Wobble controls that simulate sound artifacts found on vintage delays. There is also a Gate control and a built-in Ducking compressor that automatically attenuates the delay tail when the original signal plays. Also, there is a toggle for repitching and crossfading repeats.
Pedal
Pedal is a guitar distortion effect that adds aggressive dirty drive to any sound you run through it. The device offers three different modes: Overdrive, Distortion, and Fuzz. Additionally, each mode emulates the distinct sonic characteristics of classic distortion pedal circuits. There is also a set of controls to dial in the sound to taste.
Drum Buss
Watch out drums! Drum Buss is an analog-style channel strip loaded with all the essentials. This versatile dynamics processor works great for shaping the punch and tone of drum groups while gluing them together for a tight mix. Drum Buss features controls for distortion, compression, low-frequency enhancement, transient shaping, high-frequency dampening, and more. This device is likely to see a lot of love!
Improved Audio Effects
Many of Live’s existing Audio Effects received some major improvements and feature additions as well.
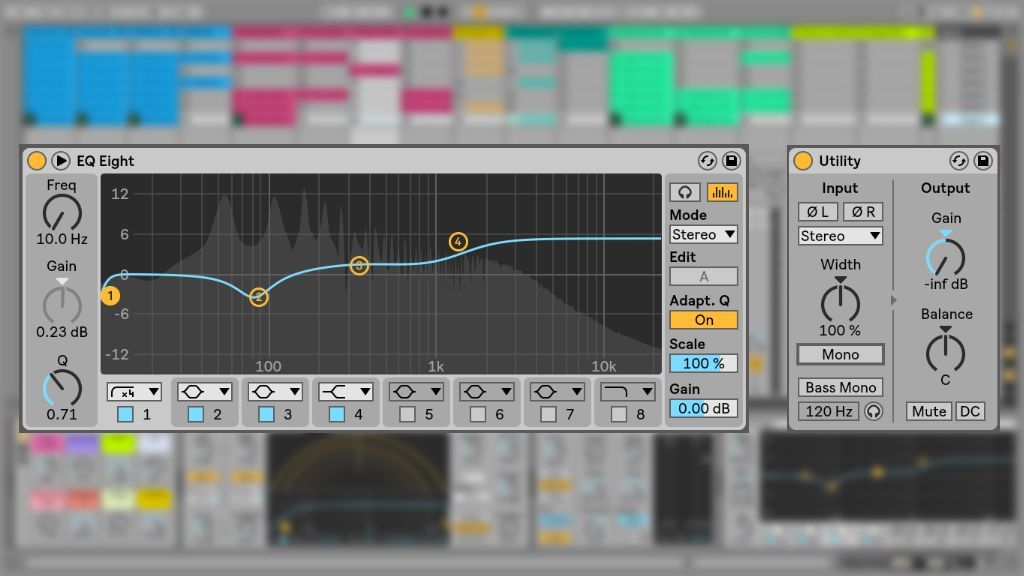
Utility
Utility received a complete overhaul with some impressive improvements! Finally, the Gain control reaches infinite dB for total silence. The Right and Left Phase buttons now invert the input signal rather than the output signal. Furthermore, Utility adds a Mono switch and a Bass Mono switch. There is also a Bass Mono Frequency slider, a Bass Mono Audition button, and a panorama Balance control. Thank you, Ableton!
EQ Eight
Goodbye sub frequencies! EQ Eight’s Frequency control now extends down to 10 Hz.
Capture
With Capture, you never have to worry about losing your improvisations because you forgot to start recording. Now, Live is always listening to MIDI input on armed or input-monitored tracks. Press the Capture button after you’ve played to create a clip containing the notes you just played. Live will also automatically try to find the tempo and set appropriate loop boundaries.
Nested Groups
You can now create Group Tracks within Group Tracks! This method is much more convenient than having to create an Audio Track and then routing audio.
Arrangement View Improvements
A lot of attention went into Live 10’s Arrangement View. Below are just a few of many notable feature improvements.
Time-Stretching Clips
Warped audio clips can now be stretched out along the timeline by clicking Shift while dragging the clip border outward. This time-saving improvement allows you to time-warp audio without having to access the Clip View.
Moving Clips with Arrow Keys
Finally, you can move Arrangement clips along the timeline using your computer keyboard’s Left/Right arrow keys. Also, toggle grid snapping by holding down CMD (Mac) / Alt (PC) while clicking an arrow key. This simple improvement makes it easier to nudge clips with more accuracy.
Reverse Shortcut Key
This addition is another welcomed time-saving upgrade. Simply click “R” to instantly reverse audio clips along the timeline. This method is much faster than having to reverse audio from the Clip View. Moreover, you can reverse only partially-selected regions of a clip.
Partially Deactivating Clips
You can now select a portion of an Arrangement clip and then click “0” to deactivate only the partially-selected region instead of the entire clip.
Visible Clip Fades
No more wasting time activating Fades from a chooser menu! Editable Clip Fades are now permanently visible for quick access.
Editing Automation
It is now possible to deactivate, reverse, and crop selected material within a time selection on an automation lane.
Loop Brace Toggle
This is another simple yet handy upgrade. Clicking CMD+L (Mac) / CTRL+L (PC) will now toggle the Edit menu’s Loop Selection.
Creating MIDI Clips
You can now create MIDI clips along the timeline by selecting a region and double-clicking. This method is much faster than selecting a region and clicking CMD+M (Mac) / CTRL+M (PC).
Mapping Lock Envelopes Switch
MIDI and Key mappings can now be assigned to the Lock Envelopes switch for quick action.
Browser Additions
Live 10’s Browser went through a renovation as well. Focus went into improving file handling, organization, color-coding, behavior changes, and more.
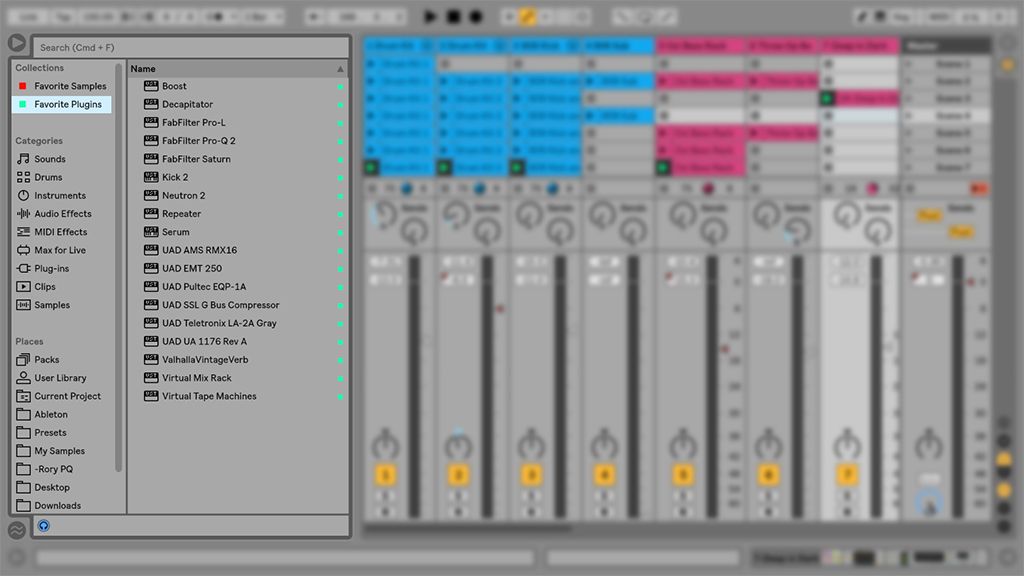
Collections
Live 10’s Browser now has a new feature called Collections. This versatile organizational feature allows you to create color-coded category labels and then assign anything you want to each category. For example, you could create a “Favorite Plugins” category and then assign all your favorite plugins to that category for quick access. This method will save a lot of time!
Updating Packs
The Packs sidebar label now shows updates made to Packs. Furthermore, users can download and install these updates from the Browser.
Group Tracks Hierarchy
The Browser will now show Group Tracks within a Live Set. This means you can drag the contents of a Group Track into the current Live Set.
Max for Live Improvements
Max now comes bundled in Live 10, and no longer requires an external installation. There are also several new devices and improvements to audio routing, loading, and support for multiple audio inputs and outputs.
Stay Tuned!
We haven’t even begun to highlight everything new in Live 10 and Push. Stay tuned to learn more about all the Automation improvements, editing enhancements, Mixer upgrades, file handling advancements, and much more.
Learn Music Production with Ableton Live
Delve deeper into the art of music production and sound design with Ableton Live. Icon’s comprehensive Music Production Courses offers like-minded musicians and industry professionals an immersive learning experience.
Learn essential knowledge to advance your craft while developing your signature sound using the industry’s most innovative software. Our extensive music production courses guide you through the fundamentals of music making while learning to master the ultimate software package for creative music production and performance.
Turn your passion for music into a Profession: Learn more about our Music School Programs!
MORE ARTICLES FROM THE ICON BLOG

FIND YOUR SOUND, HONE YOUR CRAFT:
Are you ready to turn music into a career? ICON prepares students to become music producers, composers, performers, recording artists, professional DJs, and entrepreneurs in the entertainment industry. Click below to get information about our award-winning programs: